1
\$\begingroup\$

So I've got a working texture atlas that has tiles fitting 128x128. However, I can't quite figure out how to use them. I know it's probably got something to do with

    TileRenderer.material.SetTextureScale("_MainTex", new Vector2(0.25f, 0.25f));
    TileRenderer.material.SetTextureOffset("_MainTex", new Vector2(0 * 0.25f,0));

but I'm not sure where to take it from there. Can anyone offer some advice? The size of the image is 1024x128 if that helps, which I think it might.

\$\endgroup\$

1 Answer 1

2
\$\begingroup\$

You are creating a rectangular "viewport".
The first line sets the width and height of the rectangle.
The second line translates it to the correct tile.

If all of your tiles are 128 wide and the texture is 1024 wide then each tile is 128/1024=0.125=12.5% of the overall width and 128/128=1.00=100% of the overall height.
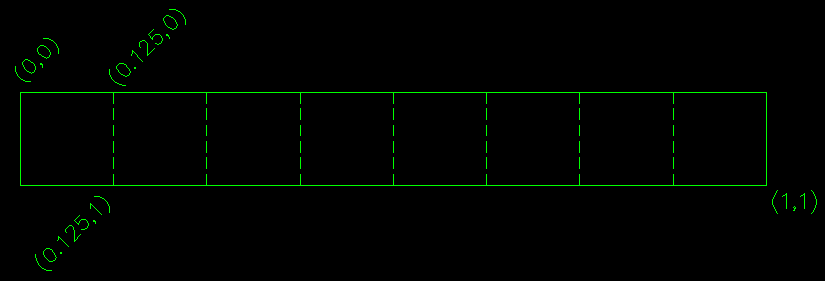
atlas diagram 1

You can think of this as applying a "world matrix" to a unit square. You scale it down to the size of an individual tile, then move it to the correct tile.

(0,0):(1,1) * (0.125, 1) = (0,0):(0.125, 1) -Scale to tile-sized
(0,0):(0.125, 1) + (x * 0.125, 0) -Move to correct tile

The counter-intuitive part is that 1,1 is always the lower-left corner of the texture, regardless of it's dimensions. That means you can modify the texture any way you'd like without having to mess with the UV's again, as long as the new texture is divided into the same number of tiles. Increasing the input texture's resolution increases the resolution of the final tile rendering by cramming more pixels into the same "viewport" (0,0):(0.125,1).
In other words, an 1/8th of twice as many pixels is twice as many pixels

Adding a second dimension:
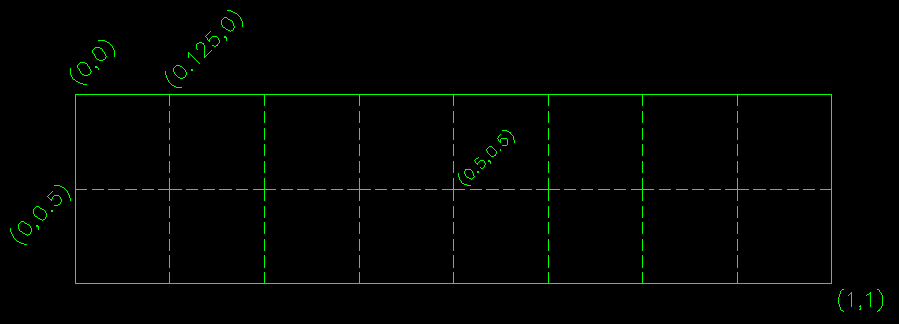
atlas diagram 2

(0,0):(1,1) * (0.125, 0.5) = (0,0):(0.125, 0.5) -Scale to tile-sized
(0,0):(0.125, 0.5) + (x * 0.125, y * 0.5) -Move to correct tile

\$\endgroup\$
3
  • \$\begingroup\$ Also keep in mind that UV(1,1) == PixelArray(Width-1,Height-1) \$\endgroup\$
    – Jon
    Commented Apr 1, 2015 at 1:25
  • \$\begingroup\$ Thanks! I've done this before, but with directly laying out a custom atlas over voxels, not indivdiual planes. However, I'm still hitting a batch count of 97 with a single texture and material. That's better then it was at least. \$\endgroup\$
    – Merlin
    Commented Apr 1, 2015 at 1:43
  • \$\begingroup\$ I've installed Unity but haven't played with it yet. If you are able to do so within Unity, you could send a single quad's-worth of control points to a hull shader and tessellate it into the correct number of tiles. Tessellation would automatically produce correct UV's at each vertex. If you change the layout of your atlas later, you can just change the two tessellation factors to match and hit go without having to re-code the vertex/UV generation. Doing so, you only make one state-change and only use one draw call. \$\endgroup\$
    – Jon
    Commented Apr 1, 2015 at 1:53

You must log in to answer this question.

Not the answer you're looking for? Browse other questions tagged .