6
\$\begingroup\$

I'm new to game development, so I need a little help.

I have to write down a little game which has a floor with hexagonal tiles, but it must be seen in an isometric view like The Sims.

Ignoring the UIKit way, I used CoreGraphics method and I managed to draw a hexagonal map and to get it working but this only in the orthogonal view.

Hoping that Cocos2D could help me, I've studied a little, but I only see that the hexagonal maps are supported only in orthogonal mode. In the stackoverflow community, someone who understand about that much more than me, told me that I simply cannot draw it with Cocos2D tiles, so, thinking at this image:

http://www.issamtp.org/gnfGr.jpg

I guessed that there must be another way, which I hope is not to calculate the "skew" manually.

The nearest results I managed to obtain were with CAAffineTransform which doesn't give the depth effect seen in the image above (at least I didn't managed to give it) or with CATransform3D without perspective.

Can someone tell me if I'm in the right way, and if so, how should I set the parameters of the Transform matrix to get the desired effect?

EDIT:

Here's the code I used

sfondo = [[Sfondo alloc] initWithFrame:CGRectMake(sfondoX, sfondoY, sfondoWidth, sfondoHeight)];
/*sfondo = [[Sfondo alloc] initWithFrame:CGRectMake(200, 200, 300, 300)];*/
[sfondo setBackgroundColor:[UIColor clearColor]];
[sfondo setDelegate:self];

CGAffineTransform transform = CGAffineTransformIdentity;
transform.b = 0.5;
transform.a = 1;
sfondo.transform = transform;
\$\endgroup\$
6
  • \$\begingroup\$ What's the depth effect that you see in the picture? Tiles at the bottom are being drawn at the same size as tiles at the top. Can you show us a screenshot of what you achieved with the CAAffineTransform? Also do you want tiles to have variable height like in the picture? \$\endgroup\$ Commented Mar 2, 2012 at 15:21
  • \$\begingroup\$ Uhm, is the "isometric depth effect", seems that the map goes along the z-axis... This is the link to the image: issamtp.org/foo1.png . As you can see it's stretched and rotated, but still does not give the same effect of isometric... \$\endgroup\$
    – IssamTP
    Commented Mar 2, 2012 at 15:32
  • \$\begingroup\$ Oh, and no, my cells does not have to have variable height, for now. \$\endgroup\$
    – IssamTP
    Commented Mar 2, 2012 at 15:39
  • \$\begingroup\$ The only problem with your image is that you scaled before rotating. Wait let me write something up to show you the difference. \$\endgroup\$ Commented Mar 2, 2012 at 15:52
  • \$\begingroup\$ Would help if I post the code used to do the transformation? \$\endgroup\$
    – IssamTP
    Commented Mar 2, 2012 at 15:55

2 Answers 2

7
\$\begingroup\$

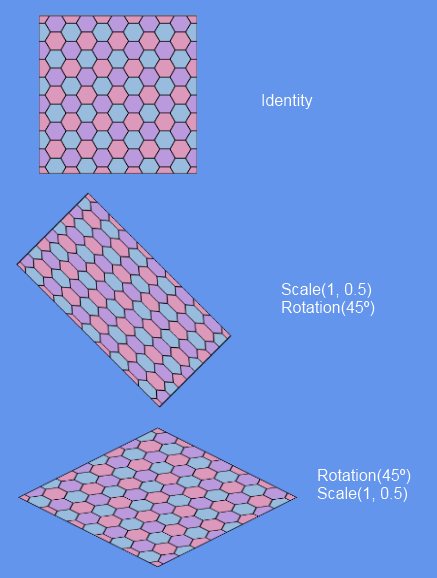
From the image you posted it looks like the only thing you did wrong was the order in which you applied the scale and rotation to your transformation. I don't have any experience with Cocos2D but I just mocked it up in XNA and here are the results:

enter image description here

And here's the transformation matrix I used in XNA. See if you can find any correlation to your code:

Matrix matrix = Matrix.CreateTranslation(-origin) *
                Matrix.CreateRotationZ(MathHelper.ToRadians(45f)) *
                Matrix.CreateScale(1f, 0.5f, 0f) *
                Matrix.CreateTranslation(position);

The origin and position were just to position it in the middle of the screen and aren't really important here. What's important is that you perform the rotation before the scaling otherwise you'll get the result depicted above.

Edit

From taking a quick look at the documentation it seems to me that you should start with CGAffineTransformIdentity, apply CGAffineTransformRotate to it, and finally apply CGAffineTransformScale to the result of the previous operation. I think that should be enough to figure it out.

\$\endgroup\$
1
  • 1
    \$\begingroup\$ OLOL I would marry you, but for now I simply give you a big, big thank you. \$\endgroup\$
    – IssamTP
    Commented Mar 2, 2012 at 16:15
0
\$\begingroup\$

For anyone looking at this by googling "cocos2d isometric transformation rotate skew" or something like that like I was: I figured out the right skews and rotations. A two-layer approach was needed due to the lack of a diagonal scale or Z rotation. For javascript devs: this makes an isometrically transformed DrawNode. I'm not sure what performance impact this has, but since it's only using the native functions I don't believe it has much if any. For other languages, it should be trivial to port.

var MapContainer = cc.Layer.extend({
  ctor: function(){
    this._super();

    this.scaleX = .947;
    this.setAnchorPoint({x:0, y:0});
    this.drawNode = new MapDrawNode();
    this.addChild(this.drawNode);

    return true;
  },
  drawNode: null
});
var MapDrawNode = cc.DrawNode.extend({
  ctor: function(){
    this._super();

    this.setAnchorPoint({x:0, y:0});
    this.y = 360; // shifts everything up, adjust as needed. Mine is 1/2 window size
    this.transform();

    // Your init code here

    return true;
  },
  transform: function(){
    this.setScaleX(0.81649658);
    this.setScaleY(0.81649658);
    this.setSkewX(16.3);
    this.setSkewY(16.3);
    this.setRotationY(45);
    this.setRotationX(45);
  }
});

Proof:

Proof

\$\endgroup\$

You must log in to answer this question.

Not the answer you're looking for? Browse other questions tagged .