I found a pretty neat solution using the LineRenderer component with a script which places its positions on a procedural arc.
First we need a character. I am using Unity Chan from the Asset Store for this demonstration.
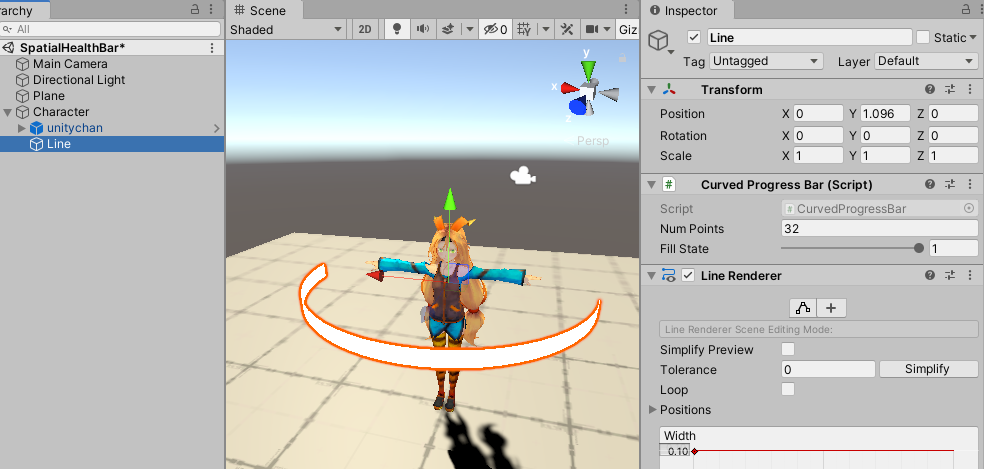
Right-click on your character in the Hierarchy and select Effect > Line. Move that new child-Object to where you want the center of the curve to be. Then go to the Inspector of the Line Renderer component and set:
- "Alignment" to "TransformZ"
- "Texture Mode" to "Tile"
- "Cast Shadows" to "Off"
Then add the following script to it:
using UnityEngine;

[RequireComponent(typeof(LineRenderer))] // without a LineRenderer, this script is pointless
[ExecuteAlways] // makes it work in the editor
public class CurvedProgressBar : MonoBehaviour {
    [SerializeField]
    private int numSegments = 32; // quality setting - the higher the better it looks in close-ups
    [SerializeField]
    [Range(0f, 1f)]
    private float fillState = 1.0f; // how full the bar is

    public float FillState {
        get => fillState;
        set {
            fillState = value;
            RecalculatePoints();
        }
    }

    private void OnValidate() => RecalculatePoints();

    // Called when you change something in the inspector
    // or change the FillState via another script
    private void RecalculatePoints() {
        // calculate the positions of the points
        float angleIncrement = Mathf.PI * fillState / numSegments;
        float angle = 0.0f;
        Vector3[] positions = new Vector3[numSegments + 1];
        for (var i = 0; i <= numSegments; i++) {
            positions[i] = new Vector3(
                Mathf.Cos(angle),
                0.0f,
                Mathf.Sin(angle)
            );
            angle += angleIncrement;
        }
        // apply the new points to the LineRenderer
        LineRenderer myLineRenderer = GetComponent<LineRenderer>();
        myLineRenderer.positionCount = numSegments + 1;
        myLineRenderer.SetPositions(positions);
    }
}
This script controls the positions of the LineRenderer. It arranges them in a half circle.
It should now look like this:

Now you can adjust to taste:
- The current fill state by changing the
FillState of the CurvedProgressBar component between 0.0 and 1.0 (both in the editor or via script while the game is running).
- Quality vs. performance by changing the NumSegments variable of the curved progress bar up or down. (The default of 32 seems good enough even for close-ups, but you might get away with a smaller number for further away objects)
- The direction where the bar appears by changing the Rotation Y
- The radius of the bar by changing the Scale X and Z. You can also set them to different values to control the amount of curvature.
- The direction from which the bar fills by setting Scale X to a negative value
- Color and width of the bar in the LineRenderer component
OK, but this is still a solid color bar. You wanted some fancy looking border around it. In order to do that we are going to create not one but two of these lines. One for the border (which always stays at fill state 1.0f) and one for the filling. Then we create separate materials for them. Here are the textures I am using. Note that both are the same size. The 2nd one has a transparent padding. Enable "Alpha Is Transparency" in the import settings of both textures.


Don't laugh at me! I am a programmer, not a ui artist!
Then create a material for it. I am using the "Particles/Standard Unlit" Shader here with the following settings:
- Rendering Mode: Fade
- Color Mode: Opaque
- Two-Sided: enabled
- Albedo: [the textures above]
- Color: Some shades of green and grey
- Tile X: 0.3183099 (the value of \$1/π\$ - important so the texture matches the arc)
but you can of course use a different shader. What matters is that you pick a shader which supports transparency and two-sided rendering.
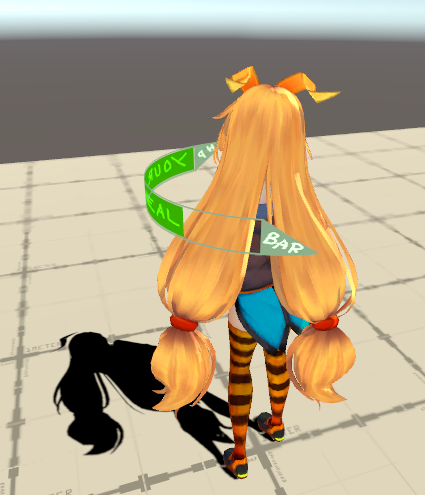
This is my end result:

To further improve the results:
- Pick HDR colors and add the Bloom post-processing effect
- Experiment with fancier shaders
- Find a better UI artist than me :)


