0
\$\begingroup\$

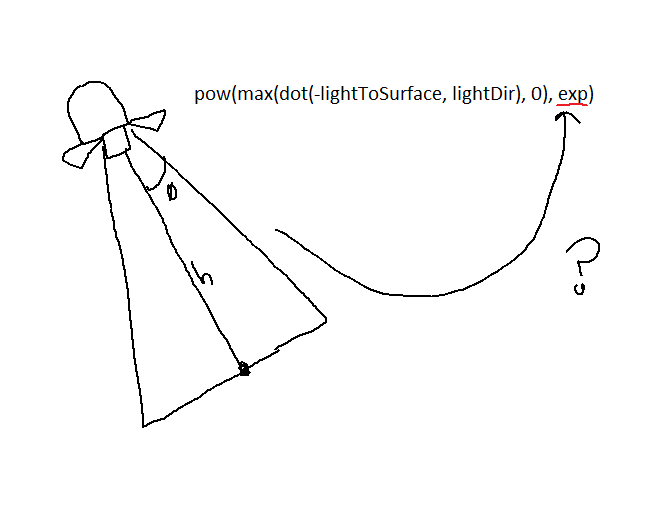
I followed a tutorial on how to build a spotlight using DirectX. This tutorial uses a point light equation plus a line of code to limit the light to the shape of a cone. I have everything working, but the equation for constraining the light uses a constant exponent to control the broadness of the light, which is all well and good if I was just tweaking the value for looks alone, but I also want to know the precise size of the cone in order to do culling on the CPU side. Here's the equation:

float lightAmnt = dot(lightToSurfaceVector, inputNormal); // point light

lightAmnt /= attenuationA + attenuationB * distance + attenuationC * distanceSquared; // falloff

// exponentConstant to control broadness
lightAmnt *= pow(max(dot(-lightToSurfaceVector, lightDir), 0.0f), exponentConstant); // spotlight

what I'd like to do is create an angle theta for the cone on the CPU, and then create the exponentConstant based on that and the range aka cone height, but I don't know how that math would work. And I realize there are other spotlight equations, but I like this one because the attenuation works identically between point and spot lights. Can anybody lend a hand?

enter image description here

link to the tutorial: https://www.braynzarsoft.net/viewtutorial/q16390-21-spotlights

\$\endgroup\$
4
  • \$\begingroup\$ Taking a number to an exponent will reduce it to zero only if the number was already zero to begin with. In pure math terms, this cone's angle is always 90° — it's just vanishingly faint over much of that range. To limit it to a narrower cutoff angle, you'd need to either change your formula, or choose a remaining brightness value that's"close enough" to zero that it won't matter for your purposes if you ignore the faint trail-off of the light below that cut-off. \$\endgroup\$
    – DMGregory
    Commented Mar 22, 2020 at 21:20
  • \$\begingroup\$ Thanks DMGregory. Yes, that makes good sense. Of courseI will need to capture anything that could be lit in a bounding volume, but I'm not sure how to judge where the trailoff would be so faint as to not be visible. Practically speaking it doesn't need to be perfect, I see your point that it will rarely every actually be reduced to zero \$\endgroup\$
    – JoeText
    Commented Mar 22, 2020 at 21:30
  • \$\begingroup\$ Are you doing your lighting in high dynamic range? If so, I'd recommend changing your formula to give yourself something you can clamp robustly at any exposure value. But if you're storing your colours in 8 bits per channel, then 0.5/255 (half the brightness of the darkest non-black pixel) would be a decently conservative cutoff value to use. \$\endgroup\$
    – DMGregory
    Commented Mar 22, 2020 at 21:35
  • \$\begingroup\$ Actually I am doing it in high dynamic range. That's a really excellent point I hadn't thought of at all. \$\endgroup\$
    – JoeText
    Commented Mar 22, 2020 at 21:37

1 Answer 1

0
\$\begingroup\$

As I mentioned in the comment, raising a number to an exponent won't make the result zero unless it was already zero to begin with. (At least not in infinite-precision real numbers. We could try to exploit floating point precision limits here, but I think that's both more complicated and less efficient than the alternatives we have at our disposal)

So even though raising the exponent does make the bright part of the cone narrower and narrower, there are still non-zero values well out into the dark part. All the way out to 90° from the light direction, in fact (again, discounting numerical precision for the moment).

Since you're rendering in high dynamic range, it's hard to pick a cutoff value that's "dark enough" that it won't have any impact on rendering, even if your exposure is extremely high. We could go super conservative, but then you'd be treating your cone as wider than it needs to be most of the time, reducing the savings you get from culling. Or we could try shifting our cutoff based on our exposure settings, but again - too complex, and we can do better!

Since you say you like your distance attenuation function as-is, let's keep that unchanged. We'll just replace this line:

lightAmnt *= pow(max(dot(-surfaceToLightVector, lightDir), 0.0f), exponentConstant);

(Note that I changed your variable name - the tutorial calls it "light to pixel" but it really points from the surface pixel to the light! So let's name it in a way that's not backwards 😉)

First, we'll note that the inner term is just the cosine of our angle from the light's axis:

float cosine = dot(-surfaceToLightVector, lightDir);

Within our desired cone wedge, that hits a minimum value we can compute on our CPU, and pass as a uniform:

float minCosine = Math.Cos(spotlightAngleLimitRadians);

So now we can remap the range from [minCosine, 1] into the range [0, 1]:

float angleFalloff = max((cosine - minCosine), 0.0f) / (1.0f - minCosine);

(If you want, you can pre-compute the reciprocal of the denominator and pass it as another uniform so this division becomes a cheaper multiplication per-pixel).

Now you're guaranteed the spotlight brightness hits zero at this limiting angle. But you can still use a power function to shape the falloff curve to your liking a little - here the exponent is arbitrary, we're not counting on it to hit a specific angle width, we're just tuning for look at this point.

lightAmnt *= pow(angleFalloff, exponentConstant);
\$\endgroup\$
1
  • \$\begingroup\$ Extremely clear and thorough! Thank you so much for going through this, it makes great sense! surfaceToLightVector name change is a nice touch, too! :) \$\endgroup\$
    – JoeText
    Commented Mar 22, 2020 at 22:14

You must log in to answer this question.

Not the answer you're looking for? Browse other questions tagged .