10
\$\begingroup\$

I am using Textures and Materials to tile my sprites, for instance when building a wall in my game.

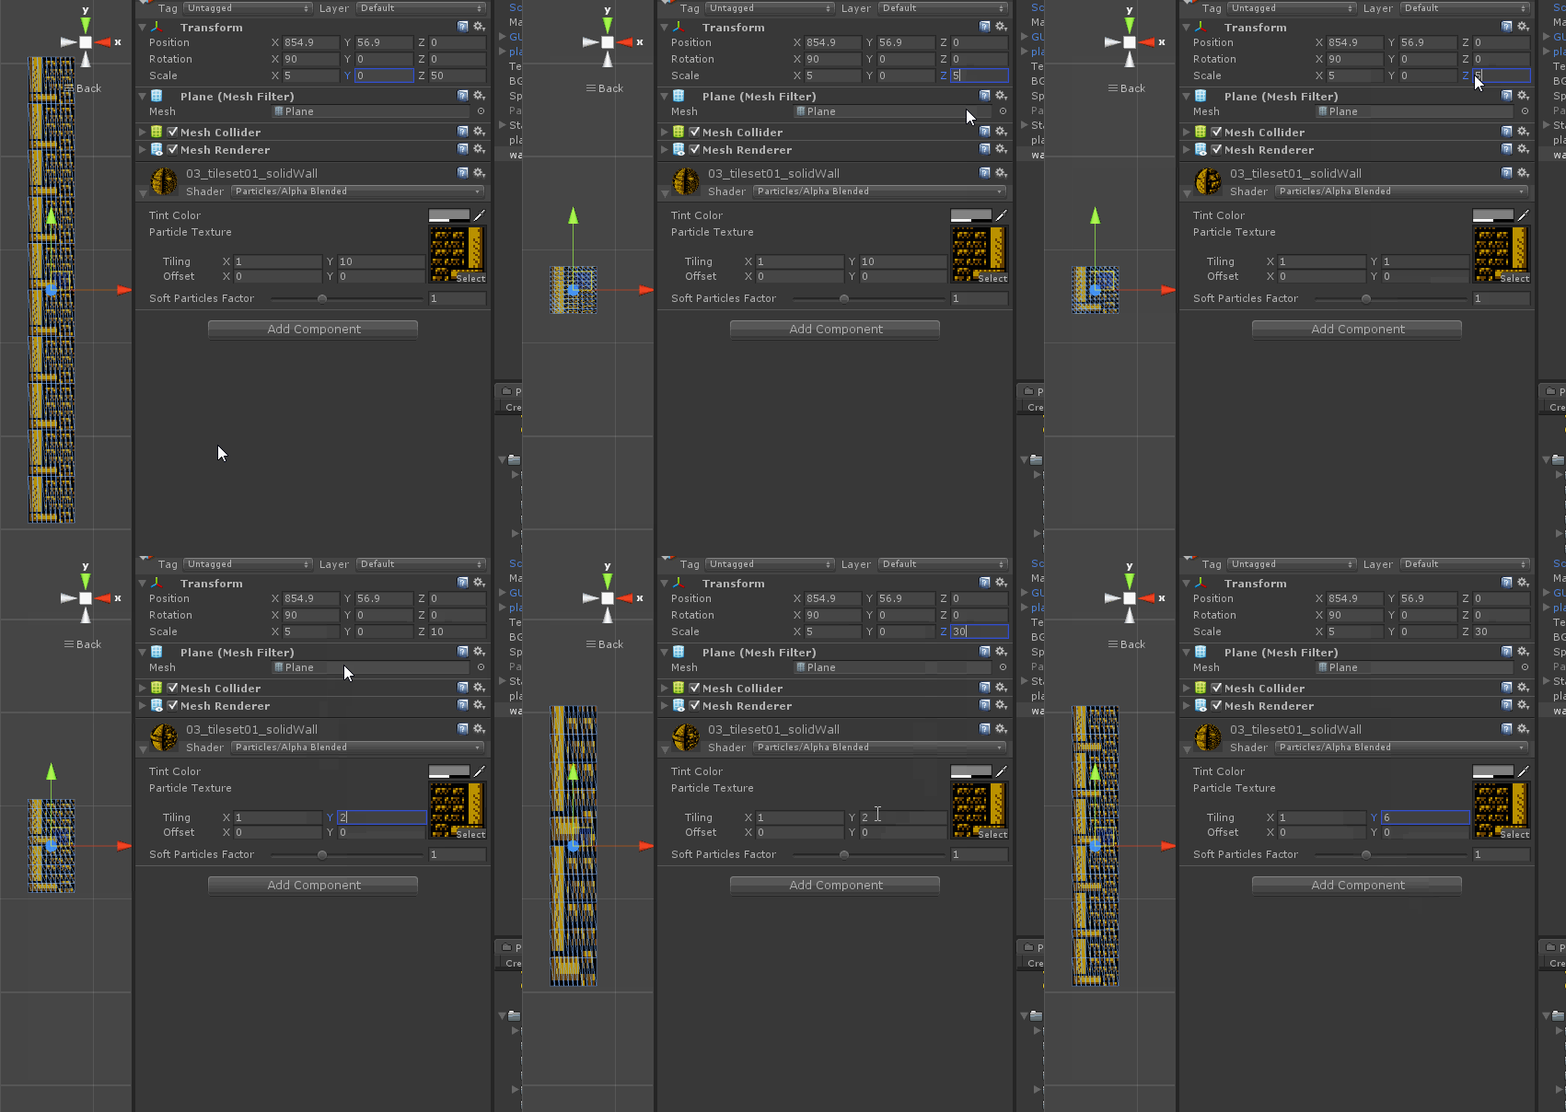
The problem with this is that everytime I resize the plane or size of my game object, I have to retouch the tiling property of the material.

Gif showing resizing / retouching workflow

I have asked around about how to solve this, and they told me to write my own shader, but after reading around a little, that seems quite a deep and long topic, to solve this small issue.

Would anyone know a way to solve this issue, or at least recommend me a shader that already does that (and if possible a small explanation on how to use it)?

\$\endgroup\$

5 Answers 5

16
\$\begingroup\$

One simple way to do this without a script modifying the tiling per object is to apply the texture in worldspace. That way you'll always have a consistent repeat rate, no matter where or how stretched your objects are.

They'll also automatically tile seamlessly where two similarly-textured objects meet, even if they're using different scales (provided you've used a seamless tiling texture)
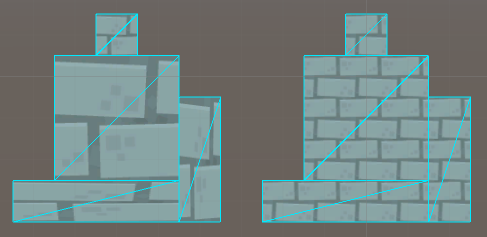
Worldspace tiling example

In this example you can see conventional texture mapping on the left, using four standard quads at different scales with one material. On the right are the same four quads textured in worldspace using a single material. (The brick texture is a free asset from Kenney.nl)

To do this, create a new shader something like the following:

Shader "Unlit/WorldspaceTiling"
{
    Properties
    {
        _MainTex ("Texture", 2D) = "white" {}
    }
    SubShader
    {
        Tags { "RenderType"="Opaque" }
        LOD 100

        Pass
        {           
            CGPROGRAM
            #pragma vertex vert
            #pragma fragment frag               
            #include "UnityCG.cginc"

            struct appdata
            {
                float4 vertex : POSITION;
                float2 uv : TEXCOORD0;
            };

            struct v2f
            {
                float2 uv : TEXCOORD0;
                float4 vertex : SV_POSITION;
            };

            sampler2D _MainTex;
            float4 _MainTex_ST;

            v2f vert (appdata v)
            {
                v2f o;
                o.vertex = mul(UNITY_MATRIX_MVP, v.vertex);

                // Gets the xy position of the vertex in worldspace.
                float2 worldXY = mul(_Object2World, v.vertex).xy;
                // Use the worldspace coords instead of the mesh's UVs.
                o.uv = TRANSFORM_TEX(worldXY, _MainTex);

                return o;
            }

            fixed4 frag (v2f i) : SV_Target
            {                   
                fixed4 col = tex2D(_MainTex, i.uv);
                return col;
            }
            ENDCG
        }
    }
}

(Here I've used an unlit opaque shader without fog as a base, but other effects can be incorporated in a straightforward way if you need.) You can use the regular texture tiling & offset fields to fine-tune how many repeats you want per world unit and the alignment of the tiling.

This approach has some limitations:

  • If the object moves through worldspace (eg. a moving platform), the texture will appear to crawl along it.

  • Rotating the object won't rotate the texture, so it will tile across it diagonally.

  • An object that's not aligned to the texture's repetition grid can show the texture cropped incorrectly (eg. if you have a border that should always sit right at the edge of a tile)

These problems can all be worked around, the fixes just require a bit more information about your setup. If you have only a few objects that need special treatment, you can use the script approach described in the other answers for those, while the worldspace tiling handles the bulk of the simpler cases.

There are also some significant advantages:

  • No additional material instances created (which can leak if you're not careful - they're not garbage collected as readily as other objects)

  • Many differently-scaled objects can be rendered in one draw call since they use the same material (under the hood, Unity will often pre-transform vertices in order to send multiple scaled objects using the same material in one batch)

  • It "just works" without needing to add extra script instances

\$\endgroup\$
1
\$\begingroup\$

Here is the script which takes care of what you need. Just attach to the game object where the material is assigned. You may remove this script when you are done editing the level, it wont be needed at all.

Added a few more optimization

  • Update only on change in transform
  • Update only if it is Unity editor and not in play mode
  • Scale factor

TextureResize.cs

using UnityEngine;
using System.Collections;

[ExecuteInEditMode]
public class TextureResize : MonoBehaviour 
{

    public float scaleFactor = 5.0f;
    Material mat;
    // Use this for initialization
    void Start () 
    {
        Debug.Log("Start");
        GetComponent<Renderer>().material.mainTextureScale = new Vector2 (transform.localScale.x / scaleFactor , transform.localScale.z / scaleFactor);
    }

    // Update is called once per frame
    void Update () 
    {

        if (transform.hasChanged && Application.isEditor && !Application.isPlaying) 
        {
            Debug.Log("The transform has changed!");
            GetComponent<Renderer>().material.mainTextureScale = new Vector2 (transform.localScale.x / scaleFactor , transform.localScale.z / scaleFactor);
            transform.hasChanged = false;
        } 

    }
}

Edit:- All these things are going to be pretty straight forward with unity's upcoming updates. Hopefully it will be out soon :)

Link:- https://www.youtube.com/watch?v=muRhea-JaIM

\$\endgroup\$
6
  • \$\begingroup\$ If I have 2 object using the same material, doesn't that mean that even if I am adapting it with this script, the other object configuration will be messed up? \$\endgroup\$ Commented Nov 11, 2015 at 14:51
  • \$\begingroup\$ yes it definitely will \$\endgroup\$
    – Hash Buoy
    Commented Nov 11, 2015 at 15:24
  • \$\begingroup\$ We can use GetComponent<Renderer>().material but it creates a new instance of the material on runtime , keep an eye on the draw call and performance. \$\endgroup\$
    – Hash Buoy
    Commented Nov 11, 2015 at 15:42
  • \$\begingroup\$ Edited the answer \$\endgroup\$
    – Hash Buoy
    Commented Nov 11, 2015 at 15:49
  • \$\begingroup\$ @HashBuoy Any reason you check Application.isEditor inside of an #if UNITY_EDITOR directive? \$\endgroup\$
    – Foggzie
    Commented Dec 11, 2015 at 23:03
0
\$\begingroup\$

It appears that you have not marked the top answer (DMGregory) as accepted, and that this is because it seems a little confusing to use the shader. I'm new, too. Here's how I made that answer work:

  • Right-Click > Create > Shader > Unlit Shader

  • Select the shader you just created. In the inspector, up at the top, click "Open". This will open it in MonoDevelop (or whatever program you have set). Copy Gregory's code into the .shader text file. Save it.

  • You can now select that shader from the dropdown menu. Wallabing. You're done.

The only problem with this approach is that it doesn't have the texture on all 3 axes. Works for a 2D game, but not for a 3D game. So yes, there is confusion with creating your own shader on that level. But if you're making a 2D game, Gregory's code will work out of the box.

\$\endgroup\$
0
\$\begingroup\$

This little snippet did the job for me:

    GetComponent<Renderer>().material.mainTextureScale = new Vector2(transform.localScale.x / textureSize.x, transform.localScale.y / textureSize.y);

I made it work in the 3D case to using a cube with 3 identical materials. One for the sides facing in the X-direction (+ or -), one for the Y direction, and one for the Z direction (I dont know which are which). Realtime rescaling looks ok.

public Vector2 textureSize;
private Material wallMaterial;

// Update is called once per frame
void Update() //or Start, if you don't need realtime rescaling.
{
    GetComponent<Renderer>().materials[0].mainTextureScale = new Vector2(transform.localScale.x / textureSize.x, transform.localScale.y / textureSize.y);
    GetComponent<Renderer>().materials[1].mainTextureScale = new Vector2(transform.localScale.x / textureSize.x, transform.localScale.z / textureSize.y);
    GetComponent<Renderer>().materials[2].mainTextureScale = new Vector2(transform.localScale.z / textureSize.x, transform.localScale.y / textureSize.y);
}
\$\endgroup\$
1
  • \$\begingroup\$ I know it's 3 years later and you may realize this, but it's worth noting that this will create three new material instances, and those materials will break batching. Your performance will be degraded when using this approach. \$\endgroup\$
    – jep
    Commented Mar 10, 2022 at 15:54
-2
\$\begingroup\$

Just edit the tiling via a script?

So if the wall when it is 1 units long, and has a tiling of 1, looks correct, when a wall that is 10 units long is made, just adjust the value in a script so the tiling is 10 units long.

Simple.

\$\endgroup\$
1
  • \$\begingroup\$ Do you know how to write that script? Im afraid I know not... \$\endgroup\$ Commented Nov 10, 2015 at 10:08

You must log in to answer this question.

Not the answer you're looking for? Browse other questions tagged .