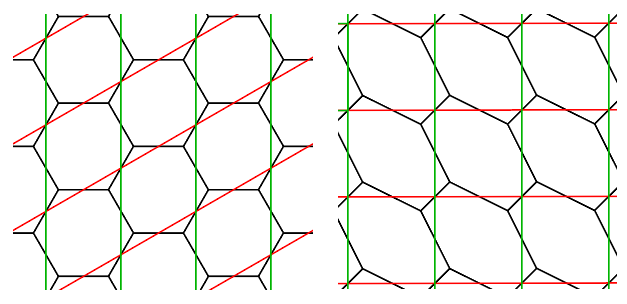
There's a useful isomorphism we can exploit between hex grids and square grids: with a simple shear transformation, we can transform one into the other.

We'll use this in two ways:
We'll use the regular tiling of these square tiles (and their symmetries) to chart out the hexagonal grid lines we need to draw.
We'll use the square grid layout to store our mask of selected tiles into a conventional 2D texture, where each texel maps to one hex tile, letting us read an arbitrary selection shape in our shader.
This requires a little kijiggery: squares aren't hexagons, after all. So even after we've done our shearing, we need to nip off a couple corners of the square and "donate" them to adjacent tiles - and accept donated corners from our neighbours - to restore the desired hexagonal shape.
Here's a utility function we can use to do most of this magic in our shader. This takes a 2D coordinate in the range [0, 1]x[0, 1], representing our position within one of these square tiles. It returns an offset to which square tile "owns" the hexagon this point belongs in, and while it's at it, computes the distance to the closest edge of the hex grid, so we can use this to draw the grid lines.
To save ourselves some cases, we'll use the symmetry of the tile:

First we'll "fold" the tile along the diagonal line y = x: if our point is in the upper-left triangle of the tile, we'll pretend it's in the lower-right instead, and adjust the offset we report back to compensate.
Then if we're in the upper-right half of the triangle remaining, we'll fold again to consider only the bottom quarter of the square. That means we need to look at just one diagonal edge instead of 4. :)
float2 ClosestHexShift(float2 p, out float edgeDistance) {

     // If we don't do any folding, we're already in the bottom quarter.
     // So if we need to donate this point to an adjacent tile,
     // it will be the one below us.
     float2 shift = float2(0, -1);

     // If we're in the top-left half, fold down to the bottom-right half
     // along the line y = x (so our "bottom" neighbour is really to our left)
     if (p.y > p.x) {
        p.xy = p.yx;
        shift = float2(-1, 0);
     }

     // If we're in the top-right of what remains, fold down to the bottom quarter
     // along the line y = 1 - x (so our "bottom" neighbour is now to our right/above)
     float2 complement = 1.0f - p;
     if (p.y > complement.x) {
        p = complement.yx;
        shift += 1.0f;
     }

     // Compute a signed distance from the diagonal edge.
     edgeDistance = ((p.x - 0.5f) / 2.0f + p.y);

     // Check if we're above the diagonal, in the "body" of the hex.
     // If so, our closest edge is either the diagonal itself,
     // or the line through our bottom-right corner.
     if (edgeDistance > 0.0f) {
        edgeDistance = min(edgeDistance, (1.0f - p.x + p.y) / 2.0f) * sqrt(3.0f);
        return (float2)0; // No shift required!
     }

     // Otherwise, this is a corner we need to clip off and donate to a neighbour.
     // Our closest edge is either the negative diagonal,
     // or the edge through our bottom-left corner
     edgeDistance = min(-edgeDistance, (p.x - p.y)/ 2.0f) * sqrt(3.0f);
     return shift;
}
You can use this in a shader - say a surface shader where you've added a worldPos value to the Input struct to expose the worldspace coordinates of the fragment being shaded inside the surface function.
void surf (Input IN, inout SurfaceOutputStandard o)
{
    // Project our worldspace position into the XZ plane,
    // and scale so the tiles have the desired (outer) radius / edge length.
    float2 hexSpace = IN.worldPos.xz / _TileRadius;

    // Apply our shear to map our hexagons into the square grid.
    // You can also apply an offset here to change where the origin sits in your texture.
    float2 squareSpace = float2(
                         2.0f/3.0f * hexSpace.x,
                        -1.0f/3.0f * hexSpace.x + 1.0f/sqrt(3.0f) * hexSpace.y);

    // Round down to the closest integer, to identify which square tile this represents.
    // Then subtract, to get our position within the tile.
    float2 cell = floor(squareSpace);
    float2 fraction = squareSpace - cell;

    // Shift our "owning" tile using our corner-clipping function.
    float edgeDistance;
    cell += ClosestHexShift(fraction, edgeDistance);

    // Look up our tile's info in our texture (mine happens to be 128x128 pixels).
    // For a simple demo, I'll pipe this out the albedo so we can see what we're getting.
    // Be sure you disable mipmaps and set filtering to "point" to avoid blending.
    fixed4 tileInfo = tex2D(_MainTex, cell / 128.0f);
    o.Albedo = tileInfo.rgb;

    // Calculate how many pixels we are from the edge of our grid line,
    // for a smooth anti-aliased effect.
    float2 velocityX = ddx(hexSpace);
    float2 velocityY = ddy(hexSpace);
    float speed = sqrt(dot(velocityX, velocityX) + dot(velocityY, velocityY));

    float pixelDistance = (edgeDistance - _LineThickness) / speed;

    float edgeStrength = 1.0f - saturate(pixelDistance);
    o.Emission = edgeStrength * _Color;

    // Leaving this as-is at their defaults from the shader template.
    o.Metallic = _Metallic;
    o.Smoothness = _Glossiness;
    o.Alpha = tileInfo.a;
}
Here's the results we have so far, using a texture full of random coloured pixels as a stand-in for our selection mask:

From here, you can duplicate the math for mapping from world space to texture space in a C# script, to translate a raycast hit from a mouse click into a pixel in the selection texture that you need to change. You can also adjust the shader to do something a bit nicer for selected pixels, like applying a highlight or glow blended on top of the base terrain texture.


