8
\$\begingroup\$

Look at the object I've rendered with my app:

enter image description here

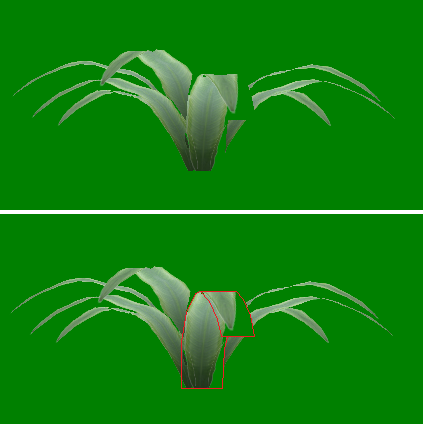
It's the same screen twice, above the original and below I've drawn (by hand :P) the shape of the mesh of one of plant's leaves. You can clearly see where the problem is.

From what I understand, this leave is drawn before the other leaves, writing a higher value to the depth buffer but not changing the pixel color (as it's transparent in that particular place). When the other leaves are drawn then their pixels in that place in the buffer are discarded since they're failing the depth test (they're farther away from the camera).

Now while I understand what the problem is I don't know how to solve it. This whole plant is one object so I can't sort by depth. What should I do?

\$\endgroup\$
4
  • \$\begingroup\$ Possible duplicate of Alpha blending not rendering properly XNA 4.0. See also How to properly implement alpha blending in a complex 3D scene. The short answer is that you'll need to either switch to alpha test (cutout), sort individual leaves, or live with some type of artifacts. \$\endgroup\$ Commented Mar 29, 2014 at 1:14
  • \$\begingroup\$ Does sorting individual leaves require dividing one object (plant) into multiple ones (leaves)? \$\endgroup\$
    – NPS
    Commented Mar 29, 2014 at 2:51
  • \$\begingroup\$ Also, does alpha test/cutout mean discarding pixels (like with HLSL command discard)? \$\endgroup\$
    – NPS
    Commented Mar 29, 2014 at 3:21
  • \$\begingroup\$ Yes, it would mean treating each leaf as a separate object for the purposes of sorting. And yes, alpha test means discarding pixels that have too low of an alpha, and rendering the remaining pixels opaque, with no blending. \$\endgroup\$ Commented Mar 29, 2014 at 4:22

1 Answer 1

10
\$\begingroup\$

While there is some interesting research into order-independent transparency rendering, it's extremely complex to implement. And even sorting individual leaves can still cause artifacts where one leaf overlaps itself. So your safest bet is probably Alpha Testing.

This is where you specify a threshold opacity value; anything above that value is rendered 100% opaque (and writes to the depth buffer), and anything below is not rendered at all (and does not write to the depth buffer - ensuring that other, occluded geometry can still be rendered there later).

Older graphics pipelines had a dedicated alpha testing phase for this. Newer ones often just use the discard command under the hood.

The trouble with this is that instead of soft translucent falloff, Alpha Testing gives you sharp aliased edges.

If your texture is relatively crisp-edged and you're usually a long distance from these surfaces, or you're using a post-process antialiasing filter anyway, then these jaggies should not look any worse than typical geometry silhouettes. You can probably stop here.

But if you can get close to the texture or your alpha falloff is very feathery, you'll often see jagged step artifacts.
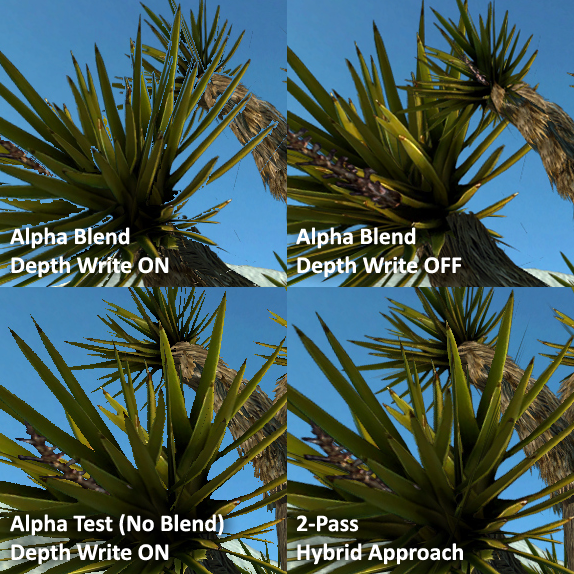
Four approaches to rendering leaves

(Images excerpted from the Wolfire Games Blog. These show the artifacts better than the Unity docs image I was using earlier. Note the fringes in the top-left, incorrect sorting top-right, and aliased edges bottom-left. In the bottom-right, the foreground leaves still show aliasing where they overlap the trunk, but the texture detail makes this less noticeable than aliasing against the sky.)

One way to address these is to use a hybrid 2-pass shader. The first pass renders with alpha testing, to ensure proper z-sorting of the opaque portions. The second pass renders with alpha blending enabled and depth writes disabled, to fill-in the translucent fringes without creating the cutouts you see in the image in the original question, where depth writes from one leaf prevent the others from rendering fully.

The fringes can still visually intersect each other in incorrect ways due to the lack of sorting, but in practice this is often not very noticeable, especially in areas of high texture detail or similar colours overlapping.

A hat tip is due here to the awesome devs at Asteroid Base who introduced me to this hybrid strategy, used to great effect in rendering the enemy characters in Lovers in a Dangerous Spacetime.

Adjusting alpha cutoff value

\$\endgroup\$
3
  • \$\begingroup\$ I realize there is no one right apporach and the choice depends on the concrete project. In my case, though, this combo does the trick: alpha blending on, alpha testing on with discard threshold at 0.5f (everything in range 0.5f - 1.0f is alpha blended), both depth testing and writing enabled. It still has some artifact but looks good enough. \$\endgroup\$
    – NPS
    Commented Mar 29, 2014 at 13:32
  • \$\begingroup\$ I'm glad you found an approach that meets your needs. One note of caution with using depth writing and alpha blending simultaneously: you can sometimes get translucent fringes where these objects overlap. Eg. unitywars.com/foliage/shot12.jpg \$\endgroup\$
    – DMGregory
    Commented Mar 29, 2014 at 14:02
  • \$\begingroup\$ I do but in my case this still looks 10 times better than aliased sharp pixels from traditional cutout. \$\endgroup\$
    – NPS
    Commented Mar 29, 2014 at 19:42

You must log in to answer this question.

Not the answer you're looking for? Browse other questions tagged .