0
\$\begingroup\$

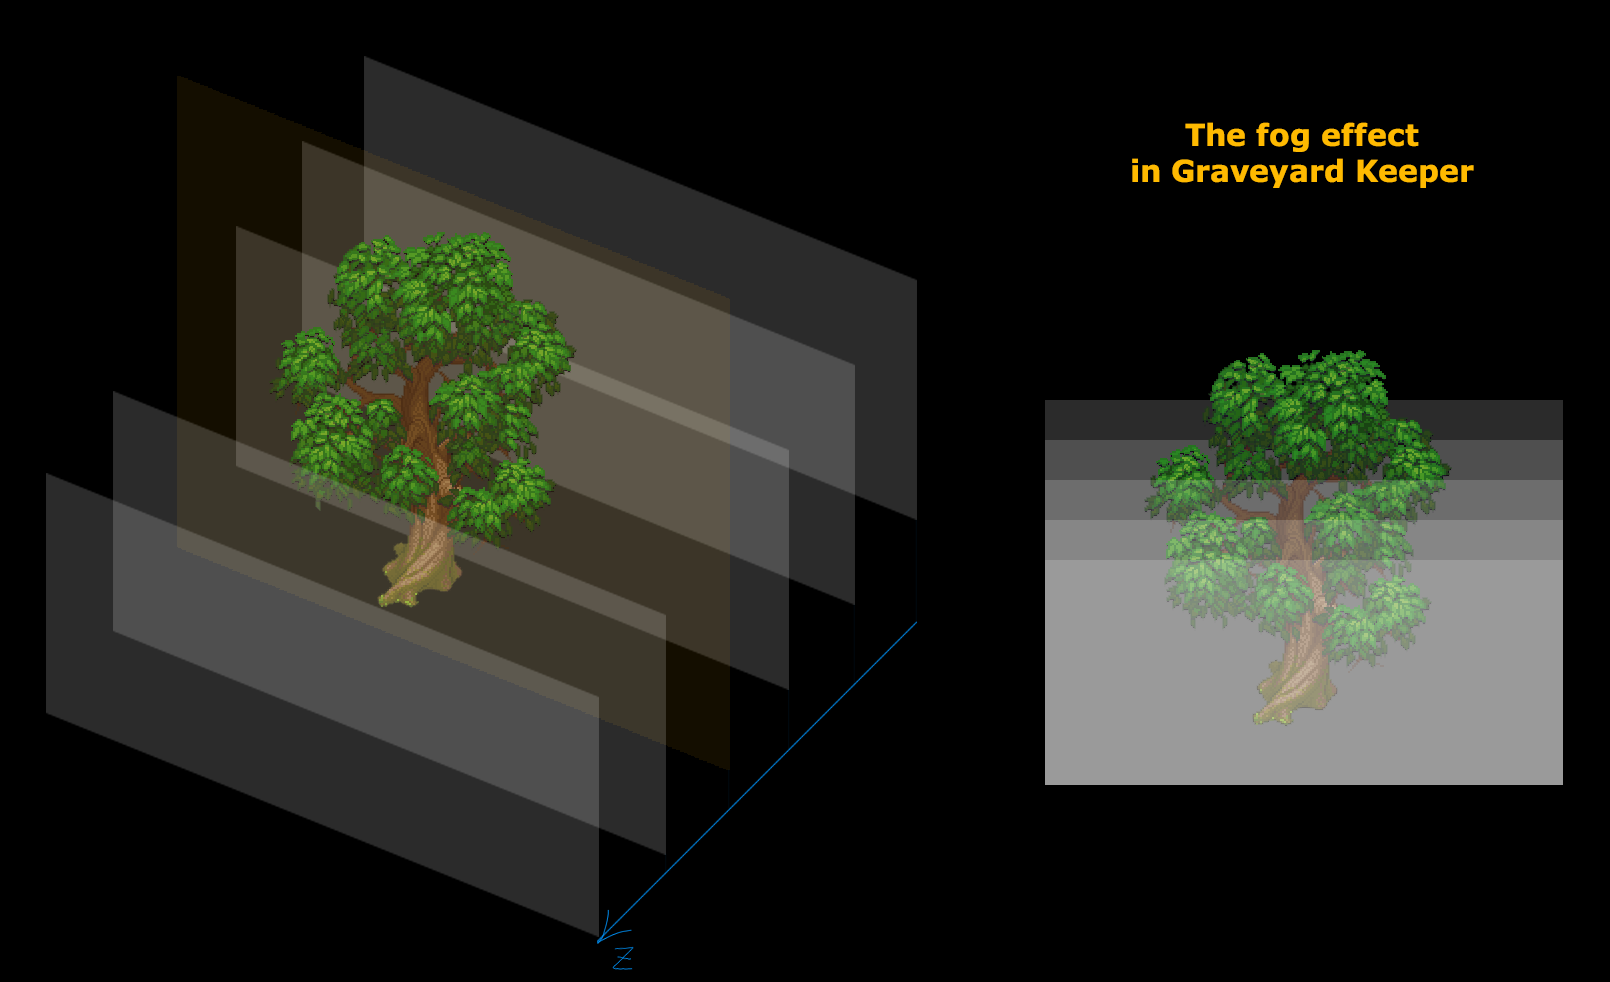
I'm trying to recreate the fog effect that Graveyard Keeper has, with several layers, so taller objects will get less fog. I'm using the approach described here: the devs post on Gamasutra

The problem with this approach is when the player is walking through each layer, it comes in front of the fog, and the fog effect "pops away", as the fog is thicker on the bottom of the fog layer. See the image where the fog is a little exaggerated.

I'm using Unity and all layers are in the "Default" sorting layer, and Y as the custom sort axis, so sprites higher up are behind lower sprites.

The jarring effect is worse the thicker fog I have.

How can I solve this, so the player doesn't "blink" like this? Thanks!

enter image description here Graveyard keeper setup

\$\endgroup\$
13
  • 3
    \$\begingroup\$ Are you sure the character should walk through the fog and not just have the multi layer fog always in front of the object? \$\endgroup\$
    – Zibelas
    Commented Oct 20, 2020 at 8:47
  • 1
    \$\begingroup\$ It looks to me like they're drawing their sprites with alpha test/cutout, rather than smoothly antialiased edges with alpha blending. That lets them write their sprites to the depth buffer, and use the depth information to fade individual pixels of the fog sprite as an object approaches it from behind, so they reach 0 alpha at the moment the pop would happen, hiding it. Is that an option for your game? \$\endgroup\$
    – DMGregory
    Commented Oct 20, 2020 at 12:17
  • \$\begingroup\$ @Zibelas It can be always in front of the player, but it needs to go in front and behind of objects, so taller objects have less shadows on top, due to the more dense fog on the bottom. \$\endgroup\$ Commented Oct 21, 2020 at 11:44
  • \$\begingroup\$ @DMGregory Very interesting, I have no experience on depth buffers and the techniques your suggesting is beyond my current skill level. But I'll look into it, and try to find some technical person to help me. Thanks :) \$\endgroup\$ Commented Oct 21, 2020 at 11:46
  • \$\begingroup\$ Answers here can help, if you can live with the sharp stairstep edge you get from the aloha testing needed for that technique (or if you have some good antialiasing post-processing that can mitigate this) \$\endgroup\$
    – DMGregory
    Commented Oct 21, 2020 at 12:02

1 Answer 1

0
\$\begingroup\$

Because the OP stated that depth testing isn't a good option, I propose a simpler approach based on z-index alone, with tuned parameters to hide the "abrupt transition effect".

Render 0: yellowish solid color layer always on top

enter image description here

Render 1: removed the always on top layer (for comparison). The fog is neutral gray, the top layer changed the mood of the scene before, maybe too much.

enter image description here

Render 2: exaggerated fog intensity, no always on top layer (for comparison)

enter image description here

Some considerations:

If we impose ourselves no buffer access, no low level OpenGL/other APIs calls, no custom shaders, we are a bit limited in what we can do.

The asset used for the fog is provided to examine it. It can be improved, for example: borders must be softer. Suggestion: play with Blur effects and other filters.

The original fog assets came from here: https://opengameart.org/content/thick-fog

The original character assets came from here: https://opengameart.org/content/tmim-heroine-bleeds-game-art

The fog asset is 1024 pixels wide. For our fog, I took a rectangle of 1024x85, very close to the top of the original fog full image.

To avoid artifacts when two rows of fog intercept in the y axis, I used the Gimp lasso tool to round borders, including the bottom border, and then blur bottom and top borders.

While each fog row is 85 pixels in height, their are separate from each other by 20 pixels in the y axis. We want overlapping to have a better continuity effect, but borders must be taken care of with proper blurring, for example. Rough borders won't do. The ones here aren't perfect either and probably only useful for testing.

The rows move at different speeds. The speed table is:

var speed_table = [1, 0.5, 2, 0.25, 0.75, 1.25]

The loop that instantiates the rows cycle through that table, and if it reach the end it starts at the beginning again. This is needed because there are more fog rows than entries in the speed table.

Formula to determine how many rows we need:

rows = viewport_height / row_distance_y

The resulting fog row asset:

enter image description here

Because that image is nearly all transparent, this other version serves to appreciate it better:

enter image description here

But the first one is the one that must be used for experimentation.

All of these parameters, the height of the fog, the separation of 20 pixels, the alpha of the pixels, all must be played with until ideal ones are found. In the first render, for example, the top layer hides the fog rows too much, somewhat defeating its purpose.

\$\endgroup\$

You must log in to answer this question.

Not the answer you're looking for? Browse other questions tagged .