3
\$\begingroup\$

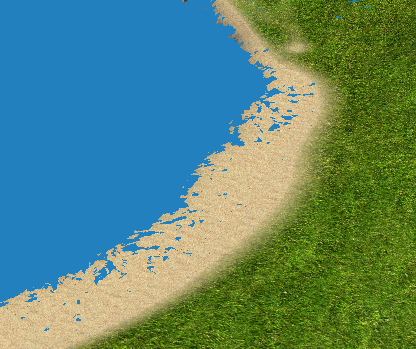
Usually, the camera's near value is set to sth like 0.1f. However, this (assuming 1.0f = 1 metre) makes everything that's closer than 10 cm from the camera invisible. On the other hand, when working with big open terrains too small near value results in this (yes, that's a sandy coast and water :P):

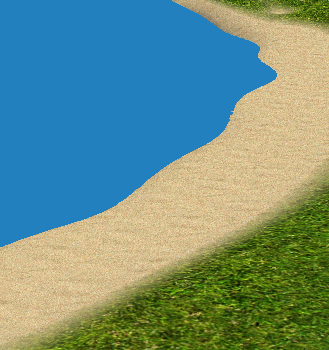
instead of this:

(Apparently, when the difference in distance between too objects is too small, you get artifacts. Something to do with precision, I guess, and apparently the precision is dependent on the near camera value.)

My question is - is it possible to set near value to something like 0.001f and not get the above artifacts?

\$\endgroup\$
3
  • 1
    \$\begingroup\$ Depth buffer precision is a broad topic you can find alot of the details outerra.blogspot.com/2012/11/… but generally speaking the default depth buffer needs to set up the near plane as far as possible, some work arounds are found in the article. \$\endgroup\$
    – concept3d
    Commented Apr 6, 2014 at 12:49
  • \$\begingroup\$ While it has its caveats and constraints (as always :P) logarithmic depth function is a great idea (so obvious now that I already know it :P). Hmm.. wanna make it an answer? \$\endgroup\$
    – NPS
    Commented Apr 6, 2014 at 15:56
  • \$\begingroup\$ TBH I don't want to repeat what the article already said. So I just hope it helped you \$\endgroup\$
    – concept3d
    Commented Apr 6, 2014 at 18:46

2 Answers 2

2
\$\begingroup\$

If you need to go nuts you can render the scene twice with two cameras, first with a camera set to near=100.0f far=10000.0f and then use a different depth buffer and render on top of the color buffer with another camera with near=0.01f and far=100.0f (unless you need to smoosh your character's nose into a wall closer than 1cm, that should be close enough)

You can switch model and environment LODs between the two passes and skip a whole bunch of objects in the far pass.

With this you can also render the far camera at half-resolution, and blur everything as a cheap depth of field effect by sampling it between the pixels, optionally add a little depth overlap (put near at 75m for the far camera) and blend the two frame buffers for pixels of the near camera that falls into the 75m to 100m range.

You may have to sample both depth buffers to figure out the real depth of any pixels for your post effects.

Cheers,

\$\endgroup\$
3
  • \$\begingroup\$ All sounds great but wouldn't it have a big impact on the performance? \$\endgroup\$
    – NPS
    Commented Dec 12, 2014 at 2:43
  • \$\begingroup\$ Yes and no: If you're rendering the far camera in 1/2 resolution (1/4 the pixels) and using lower detail meshes then rendering the near camera, on everything but some mobile systems it will actually be faster than rendering the whole thing in one pass at full resolution and full detail. On mobile systems it is likely to end up only slightly slower on some GPUs provided you double-buffer your render-to-textures properly, or MUCH slower if no double buffering is implemented and/or GPU doesn't have the memory bandwidth to cope. Desktops and TV Consoles should not be an issue. \$\endgroup\$ Commented Dec 12, 2014 at 15:11
  • \$\begingroup\$ The biggest issue is with the minimum code complexity of your home-made renderer which now needs to be able to handle multiple cameras, multiple passes, and multiple/automatic LODs (Level Of Details). But this is something that should get implemented eventually. The effort put in this will make rendering shadow maps a breeze (the light's shadow casters are cameras that render only depths, often using lower-detail meshes for speed) and split-screen 2 player rendering easily supported. \$\endgroup\$ Commented Dec 12, 2014 at 15:22
1
\$\begingroup\$

The artifacts are happening because the resolution of your depth buffer. The near and far values are not only clipping values but also set the resolution of the depth buffer.

Think of the depth buffer as an encoded image, where instead of storing color in RGB you are storing a depth value in the memory. Each fragment in the buffer will have a range from near to far. There are only a set number of steps in that range. If the near and far are too far apart, say near is .01 and far is 10000.0, the steps will be larger (unit wise). If the near and far are closer together, say 1.0 and 100.0, the steps will be smaller (unit wise). So to increase the resolution of the steps and to get more differentiation between objects rendered at different depths, decrease the range between near and far.

Side note - In reality this is a little bit misleading. Because the projection matrix will convert the depth to a range of -1 to +1. So the actual range in clip space is always the same of -1 to +1. And the precision of how many steps there are and if those steps are linear or logarithmic... let's just say I don't know that.

But practically speaking, there is a limit to the number of steps. So reducing the range between the near and far values will make more use of those steps by lowering the amount between one step and the next.

In the scene above if your focus is on the water and that is 100 units away from camera, maybe you don't need the near to be any closer than 50 away from camera. And if you can't see beyond the ground maybe you don't need the far to be farther away that 150. Of course it depends on your whole scene.

In one of my games to gain depth buffer resolution I take the focus point (my main space ship) and I set the near to -125 and the far to +125, clipping the near at 1.0.

And Stephane's answer sounds like a good way of handling it if you need more depth range than what you can get from the built in depth buffer.
\$\endgroup\$

You must log in to answer this question.

Not the answer you're looking for? Browse other questions tagged .