86
\$\begingroup\$

New Super Mario Bros has really cool 2D water that I'd like to learn how to create.

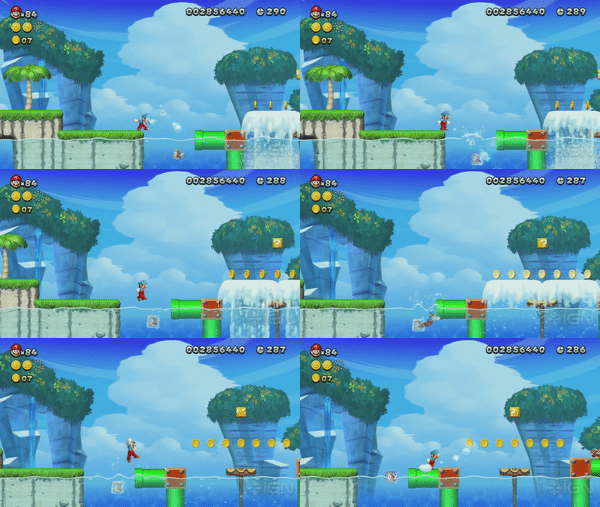
Here's a video showing it. An illustrative part:

New Super Mario Bros water effects

Things hitting the water create waves. There are also constant "background" waves. You can get a good look at the constant waves just after 00:50 in the video, when the camera isn't moving.

I assume the splash effects work as in the first part of this tutorial.

However, in NSMB the water also has constant waves on the surface, and the splashes look very different. Another difference is that in the tutorial, if you create a splash, it first creates a deep "hole" in the water at the origin of the splash. In new super mario bros this hole is absent or much smaller. I am referring to the splashes that the player creates when jumping in and out of the water.

How do I create a water surface with constant waves and splashes?

I am programming in XNA. I've tried this myself, but I couldn't really get the background sine waves to work well together with the dynamic waves.

I am not asking how the developers of New Super Mario Bros did this exactly—just interested in how to recreate an effect like it.

\$\endgroup\$
0

3 Answers 3

154
+200
\$\begingroup\$

I tried it.

Splashes (springs)

As that tutorial mentions, the surface of water is like a wire: If you pull on some point of the wire, the points next to that point will be pulled down too. All points are also attracted back to a baseline.

It's basically lots of vertical springs next to each other that pull on each other also.

I sketched that in Lua using LÖVE and got this:
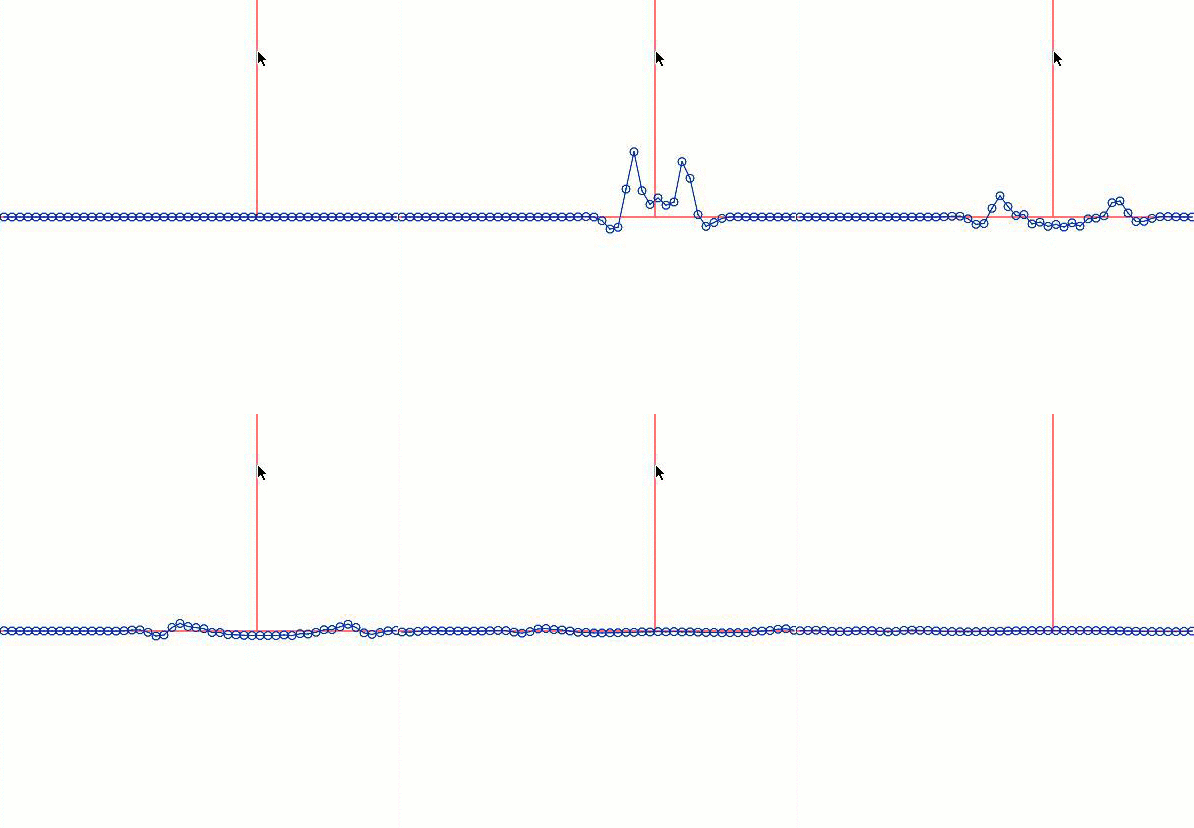
animation of a splash

Looks plausible. Oh Hooke, you handsome genius.

If you want to play with it, here is a JavaScript port courtesy of Phil! My code is at the end of this answer.

Background waves (stacked sines)

Natural background waves look to me like a bunch of sine waves (with different amplitudes, phases and wavelengths) all summed together. Here's what that looked like when I wrote it:

background waves produced by sine interference

The interference patterns look pretty plausible.

All together now

So then it's a pretty simple matter to sum together the splash waves and the background waves:
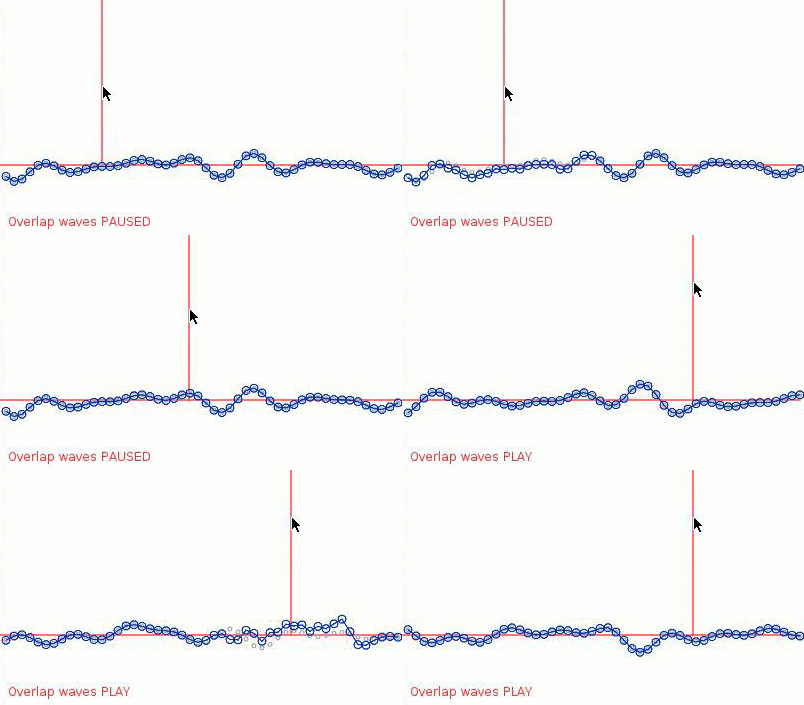
background waves, with splashes

When splashes happen, you can see small grey circles showing where the original background wave would be.

It looks a lot like that video you linked, so I'd consider this a successful experiment.

Here's my main.lua (the only file). I think it's quite readable.

-- Resolution of simulation
NUM_POINTS = 50
-- Width of simulation
WIDTH = 400
-- Spring constant for forces applied by adjacent points
SPRING_CONSTANT = 0.005
-- Sprint constant for force applied to baseline
SPRING_CONSTANT_BASELINE = 0.005
-- Vertical draw offset of simulation
Y_OFFSET = 300
-- Damping to apply to speed changes
DAMPING = 0.98
-- Number of iterations of point-influences-point to do on wave per step
-- (this makes the waves animate faster)
ITERATIONS = 5

-- Make points to go on the wave
function makeWavePoints(numPoints)
    local t = {}
    for n = 1,numPoints do
        -- This represents a point on the wave
        local newPoint = {
            x    = n / numPoints * WIDTH,
            y    = Y_OFFSET,
            spd = {y=0}, -- speed with vertical component zero
            mass = 1
        }
        t[n] = newPoint
    end
    return t
end

-- A phase difference to apply to each sine
offset = 0

NUM_BACKGROUND_WAVES = 7
BACKGROUND_WAVE_MAX_HEIGHT = 5
BACKGROUND_WAVE_COMPRESSION = 1/5
-- Amounts by which a particular sine is offset
sineOffsets = {}
-- Amounts by which a particular sine is amplified
sineAmplitudes = {}
-- Amounts by which a particular sine is stretched
sineStretches = {}
-- Amounts by which a particular sine's offset is multiplied
offsetStretches = {}
-- Set each sine's values to a reasonable random value
for i=1,NUM_BACKGROUND_WAVES do
    table.insert(sineOffsets, -1 + 2*math.random())
    table.insert(sineAmplitudes, math.random()*BACKGROUND_WAVE_MAX_HEIGHT)
    table.insert(sineStretches, math.random()*BACKGROUND_WAVE_COMPRESSION)
    table.insert(offsetStretches, math.random()*BACKGROUND_WAVE_COMPRESSION)
end
-- This function sums together the sines generated above,
-- given an input value x
function overlapSines(x)
    local result = 0
    for i=1,NUM_BACKGROUND_WAVES do
        result = result
            + sineOffsets[i]
            + sineAmplitudes[i] * math.sin(
                x * sineStretches[i] + offset * offsetStretches[i])
    end
    return result
end

wavePoints = makeWavePoints(NUM_POINTS)

-- Update the positions of each wave point
function updateWavePoints(points, dt)
    for i=1,ITERATIONS do
    for n,p in ipairs(points) do
        -- force to apply to this point
        local force = 0

        -- forces caused by the point immediately to the left or the right
        local forceFromLeft, forceFromRight

        if n == 1 then -- wrap to left-to-right
            local dy = points[# points].y - p.y
            forceFromLeft = SPRING_CONSTANT * dy
        else -- normally
            local dy = points[n-1].y - p.y
            forceFromLeft = SPRING_CONSTANT * dy
        end
        if n == # points then -- wrap to right-to-left
            local dy = points[1].y - p.y
            forceFromRight = SPRING_CONSTANT * dy
        else -- normally
            local dy = points[n+1].y - p.y
            forceFromRight = SPRING_CONSTANT * dy
        end

        -- Also apply force toward the baseline
        local dy = Y_OFFSET - p.y
        forceToBaseline = SPRING_CONSTANT_BASELINE * dy

        -- Sum up forces
        force = force + forceFromLeft
        force = force + forceFromRight
        force = force + forceToBaseline

        -- Calculate acceleration
        local acceleration = force / p.mass

        -- Apply acceleration (with damping)
        p.spd.y = DAMPING * p.spd.y + acceleration

        -- Apply speed
        p.y = p.y + p.spd.y
    end
    end
end

-- Callback when updating
function love.update(dt)
    if love.keyboard.isDown"k" then
        offset = offset + 1
    end

    -- On click: Pick nearest point to mouse position
    if love.mouse.isDown("l") then
        local mouseX, mouseY = love.mouse.getPosition()
        local closestPoint = nil
        local closestDistance = nil
        for _,p in ipairs(wavePoints) do
            local distance = math.abs(mouseX-p.x)
            if closestDistance == nil then
                closestPoint = p
                closestDistance = distance
            else
                if distance <= closestDistance then
                    closestPoint = p
                    closestDistance = distance
                end
            end
        end

        closestPoint.y = love.mouse.getY()
    end

    -- Update positions of points
    updateWavePoints(wavePoints, dt)
end

local circle = love.graphics.circle
local line   = love.graphics.line
local color  = love.graphics.setColor
love.graphics.setBackgroundColor(0xff,0xff,0xff)

-- Callback for drawing
function love.draw(dt)

    -- Draw baseline
    color(0xff,0x33,0x33)
    line(0, Y_OFFSET, WIDTH, Y_OFFSET)

    -- Draw "drop line" from cursor

    local mouseX, mouseY = love.mouse.getPosition()
    line(mouseX, 0, mouseX, Y_OFFSET)
    -- Draw click indicator
    if love.mouse.isDown"l" then
        love.graphics.circle("line", mouseX, mouseY, 20)
    end

    -- Draw overlap wave animation indicator
    if love.keyboard.isDown "k" then
        love.graphics.print("Overlap waves PLAY", 10, Y_OFFSET+50)
    else
        love.graphics.print("Overlap waves PAUSED", 10, Y_OFFSET+50)
    end


    -- Draw points and line
    for n,p in ipairs(wavePoints) do
        -- Draw little grey circles for overlap waves
        color(0xaa,0xaa,0xbb)
        circle("line", p.x, Y_OFFSET + overlapSines(p.x), 2)
        -- Draw blue circles for final wave
        color(0x00,0x33,0xbb)
        circle("line", p.x, p.y + overlapSines(p.x), 4)
        -- Draw lines between circles
        if n == 1 then
        else
            local leftPoint = wavePoints[n-1]
            line(leftPoint.x, leftPoint.y + overlapSines(leftPoint.x), p.x, p.y + overlapSines(p.x))
        end
    end
end
\$\endgroup\$
11
  • \$\begingroup\$ Great answer! Thank you very much. And also, thanks for revising my question, I can see how this is more clear. Also the gifs are very helpful. Do you by chance know a way to prevent the big hole that emerges when creating a splash too? It could be that Mikael Högström already answered this right but I had tried that even before posting this question and my result was that the hole became triangular shaped and that looked very unrealistic. \$\endgroup\$
    – Berry
    Commented Dec 11, 2012 at 19:33
  • \$\begingroup\$ To truncate the depth of the "splash hole", you could cap the maximum amplitude of the wave i.e. how far any point is allowed to stray from the baseline. \$\endgroup\$
    – Anko
    Commented Dec 11, 2012 at 20:09
  • 3
    \$\begingroup\$ BTW for anyone interested: Instead of wrapping the sides of the water, I chose to use the baseline to normalize the sides. Otherwise, if you create a splash at the right of the water, it would also create waves at the left of the water, which I found unrealistic. Also, since I didn't wrap the waves, the backgroundwaves would go flat very quickly. Therefore I chose to make those a graphical effect only, like Mikael Högström said, so that the backgroundwaves wouldn't be included in the calculations for speed and acceleration. \$\endgroup\$
    – Berry
    Commented Dec 17, 2012 at 11:00
  • 1
    \$\begingroup\$ Just wanted to let you know. We have talked about truncating the "splash-hole" with an if-statement. At first I was reluctant to do so. But now I have noticed that it actually works perfectly, since the backgroundwaves will prevent the surface from being flat. \$\endgroup\$
    – Berry
    Commented Dec 23, 2012 at 15:11
  • 4
    \$\begingroup\$ I converted this wave code to JavaScript and put it on jsfiddle here: jsfiddle.net/phil_mcc/sXmpD/8 \$\endgroup\$ Commented Jan 10, 2013 at 4:42
11
\$\begingroup\$

For the solution (mathematically speaking you can solve the problem with the solving of differential equations, but im sure they don't do it that way) of creating waves you have 3 possibilities(depending on how detailed it should get):

  1. Calculate the waves with the trigonometric functions (most simple and the fastest)
  2. Do it like Anko has proposed
  3. Solve the differential equations
  4. Use texture lookups

Solution 1

Really simple, for each wave we calculate the (absolute) distance from each point of the surface to the source and we calculate the 'hight' with the formula

1.0f/(dist*dist) * sin(dist*FactorA + Phase)

where

  • dist is our distance
  • FactorA is a value which means how fast/dense the waves should be
  • Phase is the Phase of the wave, we need to increment it with time to get an animated wave

Note that we can add as many terms together as we like (superposition principle).

Pro

  • Its really fast to calculate
  • Is easy to implement

Contra

  • For (simple) reflections on a 1d Surface we need to create "ghost" wave sources to simulate reflections, this is more complicated at 2d surfaces and it is one of the limitations of this simple approach

Solution 2

Pro

  • Its simple too
  • It allows to calculate reflections easily
  • It can be extended to 2d or 3d space relativly easily

Contra

  • Can get numerically instable if the dumping value is too high
  • needs more calculation power than Solution 1 (but not so much like Solution 3)

Solution 3

Now i hit a hard wall, this is the most complicated solution.

I didn't implement this one but it is possible to solve these monsters.

Here you can find a presentation about the mathematics of it, its not simple and there exists also differential equations for different kinds of waves.

Here is a not complete list with some differential Equations to solve more special cases (Solitons, Peakons, ...)

Pro

  • Realistic waves

Contra

  • For most games not worth the effort
  • Needs the most calculation time

Solution 4

A bit more complicated than solution 1 but not so complicated a solution 3.

We use precalculated textures and blend them together, after that we use displacement mapping (actually a method for 2d waves but the principle can also work for 1d waves)

The game sturmovik has used this approach but i don't find the link to the article about it.

Pro

  • it is more simple than 3
  • it gets good looking results (for 2d)
  • it can look realistic if the artists good a great job

Contra

  • difficult to animate
  • repeated patterns could get visible on the horizon
\$\endgroup\$
0
6
\$\begingroup\$

To add constant waves add a couple of sine-waves after you have calculated dynamics. For simplicity I would make this displacement a graphical effect only and not let it affect the dynamics themselves but you could try both alternatives and see which works out the best.

To make the "splashhole" smaller I would suggest altering the method Splash(int index, float speed) so that it directly affects not only index but also some of the close vertices, so as to spread out the effect but still have the same "energy". The number of vertices affected could depend on how wide your object is. You'll probably need to tweak the effect a lot before you have a perfect result.

To texture the deeper parts of the water you could either do as described in the article and just make the deeper part "more blue" or you could interpolate between two textures depending on the depth of the water.

\$\endgroup\$
3
  • \$\begingroup\$ Thank you for your reply. I was actually hoping that someone else had tried this before me and could give me a more specific answer. But your tips, are very much appreciated too. I am actually very busy, but as soon as I have time for it, I will try the things you've mentioned and play around with the code some more. \$\endgroup\$
    – Berry
    Commented Dec 1, 2012 at 22:35
  • 1
    \$\begingroup\$ Ok, but if there is something specific you need help with, just say so and I'll see if I can be a bit more elaborate. \$\endgroup\$ Commented Dec 3, 2012 at 18:52
  • \$\begingroup\$ Thank you very much! It's just that I haven't timed my question very well, since I have an exam week next week. After I finished my exams I will definitily spend more time on the code, and will most probably return with more specific questions. \$\endgroup\$
    – Berry
    Commented Dec 5, 2012 at 17:03

You must log in to answer this question.

Not the answer you're looking for? Browse other questions tagged .