17
\$\begingroup\$

I'm making a 2D tile based game in XNA.

Currently my lightning looks like this.

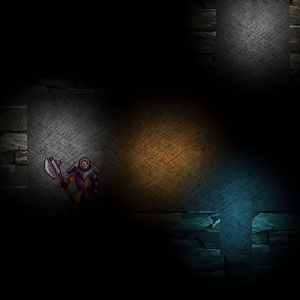
How can I get it to look like this?

Instead of each block having its own tint, it has a smooth overlay.

I'm assuming some sort of shader, and to pass the lighting values for the surrounding tiles to the shader, but I'm a beginner with shaders so I'm not sure.

My current lighting calculates the light, and then passes it to a SpriteBatch and draws with the tint parameter. Each tile has a Color that is calculated before draw in my lighting algorithm, which is used for the tint.

Here is an example on how I currently calculate lighting (I do this from left, right, and bottom too, but I got really tired of doing this frame by frame...)

enter image description here

So actually getting and drawing the light so far is no problem!

I have seen countless tutorials on fog of war and using gradient circular overlays to create smooth lightning, but I already have a nice method to assign each tile a lightning value, it just needs to be smoothed between them.

So to review

  • Calculate Lighting (Done)
  • Draw Tiles (Done, I know I will need to modify it for the shader)
  • Shade tiles (How to pass values and apply "gradient)
\$\endgroup\$

4 Answers 4

5
+50
\$\begingroup\$

How about something like this?

Don't draw your lighting by tinting your tile sprites. Draw your unlit tiles to a render target, then draw the tile lights to a second render target, representing each one as a grayscale rectangle covering the area of the tile. To render the final scene, use a shader to combine the two render targets, darkening each pixel of the first according to the value of the second.

This will produce exactly what you have now. That doesn't help you, so let's change it a bit.

Change the dimensions of your lightmap render target so that each tile is represented by a single pixel, rather than a rectangular area. When compositing the final scene, use a sampler state with linear filtering. Otherwise leave everything else the same.

Assuming you've written your shader correctly the lightmap should be effectively "scaled up" during compositing. This will get you a nice gradient effect for free via the graphics device's texture sampler.

You may also be able to cut out the shader and do this more simply with a 'darkening' BlendState, but I'd have to experiment with it before I could give you the specifics.

UPDATE

I had some time today to actually mock this up. The answer above reflects my habit of using shaders as my first answer to everything, but in this case they're not actually necessary and their use needlessly complicates things.

As I suggested, you can accomplish exactly the same effect using a custom BlendState. Specifically, this custom BlendState:

BlendState Multiply = new BlendState()
{
    AlphaSourceBlend = Blend.DestinationAlpha,
    AlphaDestinationBlend = Blend.Zero,
    AlphaBlendFunction = BlendFunction.Add,
    ColorSourceBlend = Blend.DestinationColor,
    ColorDestinationBlend = Blend.Zero,
    ColorBlendFunction = BlendFunction.Add
}; 

The blending equation is

result = (source * sourceBlendFactor) blendFunction (dest * destBlendFactor)

So with our custom BlendState, that becomes

result = (lightmapColor * destinationColor) + (0)

Which means that a source color of pure white (1, 1, 1, 1) will preserve the destination color, a source color of pure black (0, 0, 0, 1) will darken the destination color to pure black, and any shade of gray in between will darken the destination color by a middling amount.

To put this into practice, first do whatever you need to do to create your lightmap:

var lightmap = GetLightmapRenderTarget();

Then just draw your unlit scene directly to the backbuffer as you normally would:

spriteBatch.Begin(SpriteSortMode.Deferred, BlendState.AlphaBlend);
/* draw the world here */
spriteBatch.End();

Then draw the lightmap using the custom BlendState:

var offsetX = 0; // you'll need to set these values to whatever offset is necessary
var offsetY = 0; // to align the lightmap with the map tiles currently being drawn
var width = lightmapWidthInTiles * tileWidth;
var height = lightmapHeightInTiles * tileHeight;

spriteBatch.Begin(SpriteSortMode.Immediate, Multiply);
spriteBatch.Draw(lightmap, new Rectangle(offsetX, offsetY, width, height), Color.White);
spriteBatch.End();

This will multiply the destination color (unlit tiles) by the source color (lightmap), appropriately darkening unlit tiles, and creating a gradient effect as a result of the lightmap texture being scaled up to the necessary size.

\$\endgroup\$
11
  • \$\begingroup\$ This seems pretty simple, Ill see what I can do later. I tried something simlar before (I rendered the lightmap over everything else and used a blur shader, but I couldnt make the renderTarget "transparent" it had a purple overlay, but I wanted it to see through to the actuall tile layer) \$\endgroup\$
    – Cyral
    Commented May 30, 2013 at 20:41
  • \$\begingroup\$ After setting your render target on the device, call device.Clear(Color.Transparent); \$\endgroup\$ Commented May 30, 2013 at 20:59
  • \$\begingroup\$ Although, in this case, it's worth pointing out that your lightmap should probably be cleared to either white or black, those being full light and complete darkness, respectively. \$\endgroup\$ Commented May 30, 2013 at 21:00
  • \$\begingroup\$ I think thats what I tried before but it was still purple, well Ill look into it tomorrow when I have some time to work on this. \$\endgroup\$
    – Cyral
    Commented May 30, 2013 at 21:02
  • \$\begingroup\$ Almost got this all worked out, but It fades from black to white, instead of black to transparent. The shader part is what I am confused on, how to write one to dim the original unlit scene to that of the new one. \$\endgroup\$
    – Cyral
    Commented Jun 1, 2013 at 2:29
9
\$\begingroup\$

Okay here is one very simple method to create some simple and smooth 2D lightning, render in three passes:

  • Pass 1: the game world without lightning.
  • Pass 2: the Lightning without the world
  • Combination of the 1. and 2. pass which is displayed on the screen.

In pass 1 you draw all the sprites and the terrain.

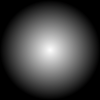
In pass 2 you draw a second group of sprites which are the light sources. They should look similar to this:
enter image description here
Initialize the render target with black and draw those sprites onto it with Maximum or Additive blending.

In pass 3 you combine the two prior passes. There are multiple different ways how they can be combined. But the simplest and least artsy method is to blend them together via Multiply. This would look like this:
enter image description here

\$\endgroup\$
2
  • \$\begingroup\$ The thing is, I already have a lighting system, and point lights don't work here because of some objects needing light to pass through and some not. \$\endgroup\$
    – Cyral
    Commented Oct 25, 2012 at 12:18
  • 2
    \$\begingroup\$ Well that's more tricky. You'll need to ray-cast to get shadows. Teraria uses big blocks for their terrain so thats no problem there. You could use imprecise ray-casting but that would look no better than terraria and might fit even less if you haven't block graphics. For a advanced and good looking technique there is this article: gamedev.net/page/resources/_/technical/… \$\endgroup\$
    – API-Beast
    Commented Oct 25, 2012 at 12:29
2
\$\begingroup\$

The second link you posted looks like a fog of war of sorts, there are a couple of other questions on this

That looks to me like a texture, where you "erase" bits of the black overlay (by setting the alpha of those pixels to 0) as the player moves forward.

I would say the person must have used a brush type "erase" where the player has explored.

\$\endgroup\$
2
  • 1
    \$\begingroup\$ It's not fog of war, It's calculates the lightning each frame. The game I pointed out is similar to Terraria. \$\endgroup\$
    – Cyral
    Commented Oct 25, 2012 at 11:08
  • \$\begingroup\$ What I meant is it might be implemented similar to fog of war \$\endgroup\$
    – bobobobo
    Commented Oct 25, 2012 at 11:49
2
\$\begingroup\$

Light vertices (corners between tiles) instead of tiles. Blend lighting across each tile based on its four vertices.

Do line-of-sight tests to each vertex to determine how lit it is (you can either have a block stop all light or decrease light, e.g. count how many intersections to each vertex combined with distance to calculate a light value rather than using a pure binary visible/not-visible test).

When rendering a tile, send the light value for each vertex to the GPU. You can easily use a fragment shader to take the interpolated light value at each fragment in the tile's sprite to light each pixel smoothly. It's been long enough since I've touched GLSL that I wouldn't feel comfortable giving real a code sample, but in pseudo code it would be as simple as:

texture t_Sprite
vec2 in_UV
vec4 in_Light // coudl be one float; assuming you might want colored lights though

fragment shader() {
  output = sample2d(t_Sprite, in_UV) * in_Light;
}

The vertex shader simply has to pass the input values on to the fragment shader, nothing even remotely complicated.

You'll get even smoother lighting with more vertices (say, if each tile is rendered as four sub-tiles), but that may not be worth the effort depending on the quality you're going for. Try it the simpler way first.

\$\endgroup\$
3
  • 1
    \$\begingroup\$ line-of sight tests to each vertex? That's going to be expensive. \$\endgroup\$
    – ashes999
    Commented May 30, 2013 at 2:19
  • \$\begingroup\$ You can optimize with some cleverness. For a 2D game you can do a surprising number of ray tests against a strict grid quite quickly. Instead of a straight LOS test you could "flow" (I can't for the life of me think of the proper term right now; beer night) the light values over the vertices rather than doing ray tests, too. \$\endgroup\$ Commented May 30, 2013 at 2:32
  • \$\begingroup\$ Using line of sight tests would complicate this more, I already have lighting figured out. Now when I send the 4 verticies to the shader, how can I do that? I know you don't feel comfortable giving real a code sample, but if I could get a little more information that would be nice. I also edited the question with more info. \$\endgroup\$
    – Cyral
    Commented May 30, 2013 at 11:48

You must log in to answer this question.

Not the answer you're looking for? Browse other questions tagged .