1
\$\begingroup\$

I've just recently been getting to grips with Spine and Unity 2D, porting some of my assets from different sources (SWFs, SVGs, GIFs, Canvas animations). Whilst I'm able to reproduce a lot of what I can do in these other systems — very nicely I might add — one thing that seems to be alluding me is how to animate an attachment.

Obviously Spine is still developing, so I don't expect to be able to run full bitmap/vector animations as attachments; but one thing the software does seem to have already is the ability to set transparency, and to set multiple attachments to one slot. I was hoping someone out there would know if these abilities can be combined to at least achieve a faded switch between attachments — either using the GUI or via coding.

For example, this video shows my character animated with the two states I wish to switch between.

I'm aware that you can key frame a switch between attachments, but this leads to a sudden jump in what graphic is shown. I could theoretically create 8 extra attachments on each slot and set their opacity graduating from 0.1 to 0.8 — but this seems like a rather hack way of doing things, and would also be awkward to shift along the timeline.

My fallback would be to animate the two full states of the character, export them, and leave Unity to handle switching from one to the other.

Any ideas?

\$\endgroup\$

1 Answer 1

4
\$\begingroup\$

If you want your character's look to change uniformly (i.e. at any time, all sprites are at the same point of transition between states), the simplest way I can think of is to create them as separate skins in Spine. The Unity runtime tfor Spine then lets you render the skeleton with either skin, so you can control the transparency by rendering each skin once, the second time with variable transparency.

The issue with this is of course that the transparency is applied to the whole skin.


If you want your character's images to change independently (so, for example, the lower arms have a "powered up" skin, while the rest stays normal), you can create multiple slots for your character's bones each with a different image.

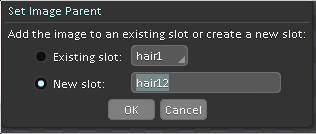
If you drag an image onto a bone that already has a slot, you'll get this handy dialog:

The dialog shown when dragging an image onto a bone that has a slot already

That bone will then have two slots, each of which has an associated image:

a bone with two slots

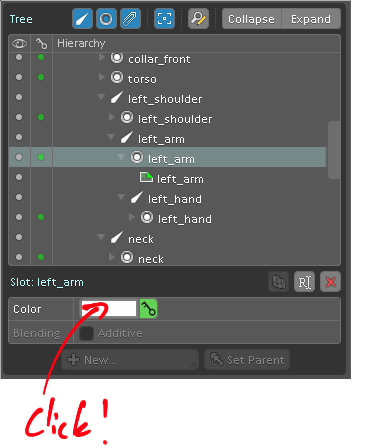
You can then keyframe your slots' transparencies in an animation. In Animation mode, you can select a slot in the tree and change its colour tint from the properties box just below the tree:

How to find the slot colour keyframing option

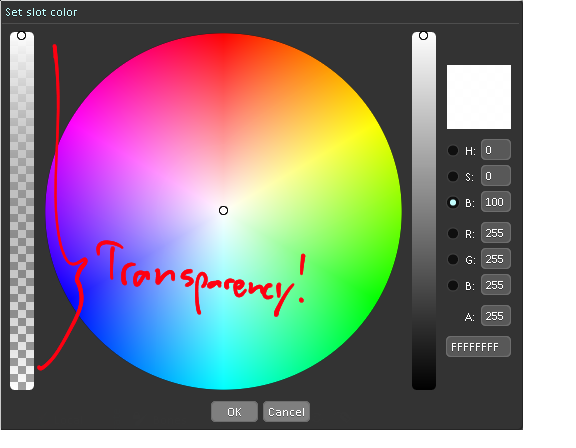
This brings up a colour selector that includes a transparency slider.

Colour selector, with transparency slider pointed out

As usual, hit the key icon to keyframe the change.

This way, you can control the relative visibilities of two images attached to one bone with just the usual animation keyframes. Spine runtimes also let you manipulate these transparencies at runtime.

\$\endgroup\$
1
  • \$\begingroup\$ Yep, separate skins is the way to go. At least for this character as I want the skin to change all at once. Thanks for the answer, with pictures! :) \$\endgroup\$
    – Pebbl
    Commented Jan 3, 2014 at 9:29

You must log in to answer this question.

Not the answer you're looking for? Browse other questions tagged .