I just got an issue related to a 64k method in Unity so that's why I'm unable to build my project. It shows method limitation exceed the limit of 64k method count. So can anyone here help me out to resolve this issue?
2 Answers
This answer relies heavily on Android's official documentation (the quoted parts, specifically).
How to setup Multidex Support for Unity Project
What is Multidex:
Android application (APK) files contain executable bytecode files in the form of Dalvik Executable (DEX) files, which contain the compiled code used to run your app. The Dalvik Executable specification limits the total number of methods that can be referenced within a single DEX file to 65,536, including Android framework methods, library methods, and methods in your own code. Getting past this limit requires that you configure your app build process to generate more than one DEX file, known as a multi dex configuration.
When we use Multidex:
When we exceed the total number of methods that can be referenced within a single DEX file to 65,536- including Android framework methods, library methods and methods in your own code.
Avoid the 64K limit
Before configuring your app to enable use of 64K or more method references, you should take steps to reduce the total number of references called by your app code, including methods defined by your app code or included libraries. The following strategies can help you avoid hitting the DEX reference limit:
Review your app's direct and transitive dependencies - Ensure any large library dependency you include in your app is used in a manner that outweighs the amount of code being added to the app. A common anti-pattern is to include a very large library because a few utility methods were useful. Reducing your app code dependencies can often help you avoid the DEX reference limit.
Remove unused code with ProGuard - Enable code shrinking to run ProGuard for your release builds. Enabling shrinking ensures you are not shipping unused code with your APKs.
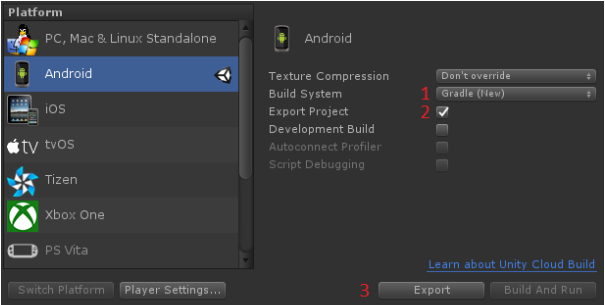
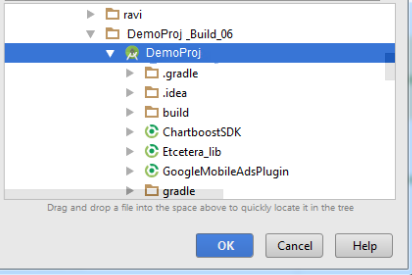
Aside from these official tips, when building your Unity project, following these steps will help you further:
Setting up your app project to use a multi dex configuration requires that your make the following modification.
If your minSdkVersion is set to 21 or higher, all you need to do is set
multiDexEnabledtotruein your module-level build.gradle file, as shown here:android { defaultConfig { ... minSdkVersion 21 targetSdkVersion 26 multiDexEnabled true } ... }However, if your
minSdkVersionis set to 20 or lower, then you must use the multidex support library as follows:3.1. Modify the module-level build.gradle file to enable multidex and add the multidex library as a dependency, as shown here:
android {
    defaultConfig {
        ...
        minSdkVersion 15
        targetSdkVersion 26
        multiDexEnabled true
    }
    ...
}

dependencies {
  compile 'com.android.support:multidex:1.0.1'
}
3.2. Depending on whether you override the Application class, perform one of the following:
- If you do not override the
Applicationclass, edit your manifest file to setandroid:namein the<application>tag as follows:
<?xml version="1.0" encoding="utf-8"?> <manifest xmlns:android="http://schemas.android.com/apk/res/android" package="com.example.myapp"> <application android:name="android.support.multidex.MultiDexApplication" > ... </application> </manifest>- If you do override the
Applicationclass, change it to extend MultiDexApplication (if possible) as follows:
public class MyApplication extends MultiDexApplication { ... }- Or if you do override the Application class but it's not possible to change the base class, then you can instead override the attachBaseContext() method and call MultiDex.install(this) to enable multidex:
public class MyApplication extends SomeOtherApplication { @Override protected void attachBaseContext(Context base) { super.attachBaseContext(base); MultiDex.install(this); } }- If you do not override the
Check error form other plugins manifest and clean the project.And sysc again.
If there is any dependency issue in your project, run this command in Android Terminal
% Gradle clean App."App name"Copy these dependency in your Application Gradle , under dependencies:
compile fileTree(include: ['*.jar'], dir: 'bin')
compile fileTree(include: ['*.jar'], dir: 'libs')
Add the signingConfig in your main projects Gradle.
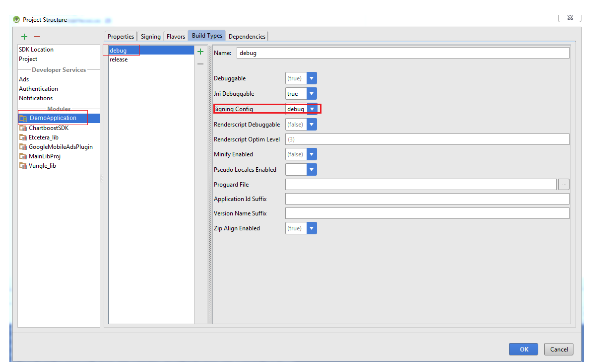
Or set the Signing mode to Debug mode by manually, Go to File -> Project Structure -> Under Modules Click on your project and under Build Types select Debug ->choose Signing Config-> debug
Now sync your Gradle and build the project.
-
1\$\begingroup\$ How large is your project that led to this error? \$\endgroup\$– Evorlor ♦Commented Jul 10, 2017 at 12:11
-
1\$\begingroup\$ Actually, I'm using Google AdMob mediation so for that is used to add 6-7 ads SDK so my final projects method count was about 76k. \$\endgroup\$– RakeshCommented Jul 10, 2017 at 12:25
I would recommend you to go through this link which will help you to create multidex enabled games directly through unity.
https://medium.com/@abhpatidar/solving-unity-dex-issue-538e134c8809
Note: This will only enable multidex in unity itself (and should fix multidex issues). It won't fix gradle related problems.
-
3\$\begingroup\$ This is currently a link-only answer: although the link answers the question, the answer does not. You might want to include the core of the linked content here (the link per se is not bad, is just havin only the link which is bad). \$\endgroup\$– Vaillancourt ♦Commented Mar 5, 2018 at 16:58
-
\$\begingroup\$ I agree with you but the steps written are too many. That's why I had to create an article and share the link. I would prefer that way so that I will have only one source of truth rather than creating multiple. \$\endgroup\$ Commented Mar 6, 2018 at 2:19
-
\$\begingroup\$ In understand but that's not how Stack Exchange sites work: link-only answers get deleted.¤ If you want, I can convert this answer to a comment of the question: you'll keep your reference visible for the future users, and we won't have a link only answer. (¤The main issue with link only answers is that if you take your site down (or your ISP goes bankrupt with all your data), this answer will be totally worthless; this is why the answer should answer the question.) \$\endgroup\$– Vaillancourt ♦Commented Mar 6, 2018 at 2:30
-
\$\begingroup\$ Make sense. I will convert my answer to complete instructions. \$\endgroup\$ Commented Mar 6, 2018 at 7:35


