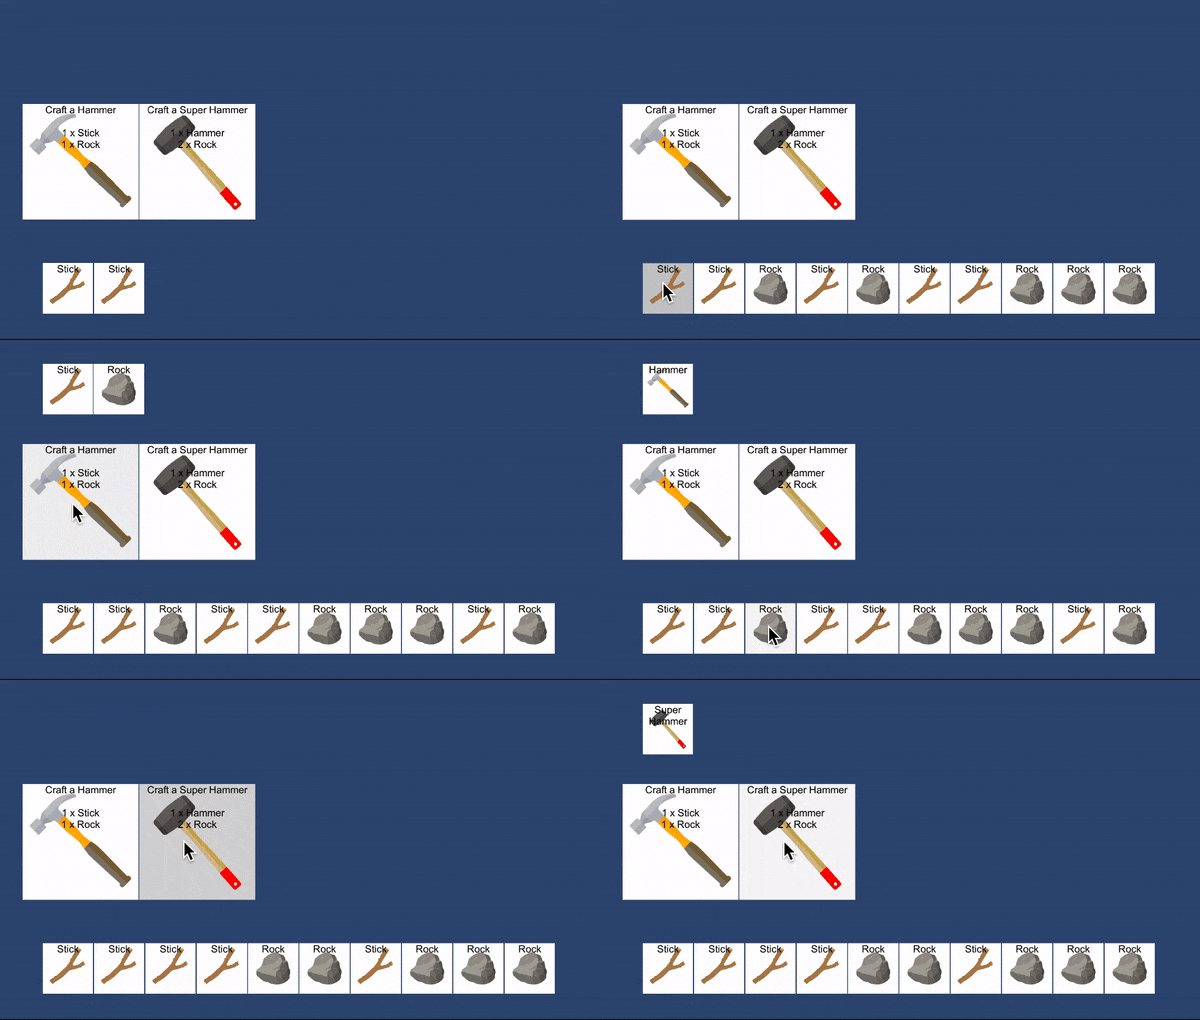
The design pattern I would adopt revolves around creating an abstract Item class that derives from ScriptableObject. From there I would derive Element and CraftableItem and classes to provide basic functionality for raw materials and items that you can assemble from them.
The following shows how you can put this together . This example comprises a simple scene layout, 1 UI prefab and 5 scripts:
- Item.cs
- Element.cs
- CraftableItem.cs
- CraftingStuff.cs
- CraftingController.cs
Item prescribes the basic properties and methods of any inventory item, such as prefabs and sprites used by the UI, name and inventory slots used. Methods include functions to generate runtime instances, as well as basic inventory actions like AddItem, DropItem, and UseItem.
using System.Collections;
using System.Collections.Generic;
using UnityEngine;
using CraftingStuff;

public abstract class Item : ScriptableObject
{
    [Tooltip("What is this thing called?")]
    public string title;
    [Tooltip("2D image for use in dialogs, etc")]
    public Sprite sprite;
    [Tooltip ("How many inventory slots does this item occupy")]
    public int size;
    [Tooltip("game object to be instantiated")]
    public GameObject pickup;
    public abstract ItemType Type { get; }

    /// <summary>
    /// Creates the derived runtime class instance and populates it as required.
    /// </summary>
    /// <returns>The derived class runtime, cast to ItemRuntime.</returns>
    public abstract ItemRuntime GenerateRuntime();

    /// <summary>
    /// Perform an necessary actions to instantiate the object in the game world.
    /// </summary>
    /// <param name="runtime">Runtime.</param>
    public abstract GameObject InstantiatePickup(ItemRuntime runtime);

    /// <summary>
    /// Called when the player chooses to add the item to inventory.
    /// </summary>
    /// <param name="runtime">the item runtime.</param>
    public abstract void AddItem(ItemRuntime runtime);
    /// <summary>
    /// Called when the player uses the item, For instance, to subtract health from the item.
    /// </summary>
    /// <param name="runtime">Runtime.</param>
    public abstract void UseItem(ItemRuntime runtime);

    /// <summary>
    /// Called when the player drops the item. Performs housekeeping such as removing gameobjects, cancelling loans, etc.
    /// </summary>
    /// <param name="runtime">The item runtime.</param>
    public abstract void DropItem(ItemRuntime runtime);
}
We need to define a few enums and serializeable classes, we'll use the namespace CraftingStuff for this. Note that some of this stuff is notional in terms of this tutorial, but also reasonable - for instance we aren't actually doing anything with bench types in demo code...:
using UnityEngine;

namespace CraftingStuff
{
    public enum ItemType
    {
        element,
        rareElement,
        craftable,
        weapon,
        tool,
        food,
        bench
    }

    public enum BenchType
    {
        tool1,
        forge1,
        food1,
        weapon1,
        tool2,
        forge2,
        weapon2
    }

    [System.Serializable]
    public class Ingredient
    {
        public Item item;
        public int amount;
    }

    [System.Serializable]
    public abstract class ItemRuntime
    {
        public int id;
        public abstract Item Immutable { get; set; }
        public GameObject pickup;

        public virtual void SomeHandler(Transform t)
        {
           //do something with t
        }
    }
}
Element in our example is simply a basic implementation of Item, with the methods wired up. Those methods are:
GenerateRuntime() creates an ItemRuntime object and casts it to ElementRuntime. This object is what will be held in inventories, etc. It has a reference this element type's definition (the Immutable) as well as a few runtime properties.
InstantiatePickup() instantiates the gameObject that will be used by the UI. It configures that object (which is a UI button) by decorating its sprite and text, and adds a onClick listener to the button. Finally it stashes a reference to the gameobject in the runtime object.
AddItem() is the callback when the button is clicked. Basically it swaps out the button's listener and passes the button's transform as well as the runtime to the controller's AddItemToInventory method, which is described below.
This file also defines ElementRuntime, which extends ItemRuntime. Its basic function is to cast the Immutable to Element.
using System.Collections;
using System.Collections.Generic;
using CraftingStuff;
using UnityEngine;
using UnityEngine.UI;

[CreateAssetMenu(menuName = "Item/ New Element")]
public class Element : Item
{
    public override ItemType Type { get { return ItemType.element; } }

    public override void AddItem(ItemRuntime runtime)
    {
        var button = runtime.pickup.GetComponent<Button>();
        button.onClick.RemoveAllListeners();
        button.onClick.AddListener(() => UseItem(runtime));
        CraftingController.instance.AddItemToInventory(runtime.pickup.transform, runtime);
    }

    public override void UseItem(ItemRuntime runtime)
    {
        //do any housekeeping after using -- example: reduce health
    }

    public override ItemRuntime GenerateRuntime()
    {
        var element_rt = new ElementRuntime();
        element_rt.Immutable = this;
        // do other initialization for runtime instance
        return element_rt;
    }

    public override GameObject InstantiatePickup(ItemRuntime runtime)
    {
        runtime.pickup = Instantiate(pickup);
        runtime.pickup.name = title;
        runtime.pickup.transform.Find("Text").GetComponent<Text>().text = title;
        runtime.pickup.transform.Find("Sprite").GetComponent<Image>().sprite = sprite;
        runtime.pickup.GetComponent<Button>().onClick.AddListener(() => AddItem(runtime));
        return runtime.pickup;
    }

    public override void DropItem(ItemRuntime runtime)
    {

    }
}

public class ElementRuntime : ItemRuntime
{
    private Element element;
    public override Item Immutable { get { return element; } set { element = (Element)value; } }
}
CraftableItem is similar to Element, but adds prerequisites in the form of a list of ingredients (Items with amounts) and a specific crafting bench that is required. There is also a time property. A CraftItem method is specified. Some of the implemented methods are slightly different than Element as well.
CraftItem() calls the controller's RecipeCheck method with the item's list of ingredients and bench requirement. If RecipeCheck returns true, it then call's the controller's AddCraftedItem method, passing the runtime cast to CraftedItemRuntime as a parameter.
AddItem() is slightly different than Element's version -- in this case were need to instantiate a new UI object for the inventory as we want to keep the crafting item in the crafting grid.
using System.Collections;
using System.Collections.Generic;
using CraftingStuff;
using UnityEngine;
using UnityEngine.UI;

[CreateAssetMenu(menuName = "Item/ New CraftableItem")]
public class CraftableItem : Item
{
    //new properties unique to craftables:
    public List<Ingredient> ingredients;
    public BenchType benchType;
    public float craftingTime;

    public override ItemType Type { get { return ItemType.craftable; } }

    public void CraftItem(ItemRuntime runtime)
    {
        //if prereqs are met, begin crafting
        var controller = CraftingController.instance;
        if (controller.RecipeCheck(ingredients, benchType))
        {
            controller.AddCraftedItem(runtime as CraftableRuntime);
        }
        else
        {
            Debug.Log("necessary prereqs missing");
        }
    }

    public override void AddItem(ItemRuntime runtime)
    {
        var go = Instantiate(pickup);
        go.name = title;
        go.transform.Find("Text").GetComponent<Text>().text = title;
        go.transform.Find("Sprite").GetComponent<Image>().sprite = sprite;
        var button = go.GetComponent<Button>();
        var new_runtime = GenerateRuntime(); //this is a new instance
        new_runtime.pickup = go;
        button.onClick.AddListener(() => UseItem(runtime));
        CraftingController.instance.AddItemToInventory(go.transform, new_runtime);
    }

    public override void UseItem(ItemRuntime runtime)
    {
        //do any housekeeping after item is used. Example: tool wears out
    }

    public override ItemRuntime GenerateRuntime()
    {
        var craftable_rt = new CraftableRuntime();
        craftable_rt.Immutable = this;
        // do other initialization for runtime instance
        return craftable_rt;
    }

    public override GameObject InstantiatePickup(ItemRuntime runtime)
    {
        runtime.pickup = Instantiate(pickup);
        runtime.pickup.name = "Craft a " + title;
        string legend = $"Craft a {title}\n";
        for(int i = 0; i < ingredients.Count; i++)
        {
            legend += $"\n{ingredients[i].amount} x {ingredients[i].item.title}";
        }
        runtime.pickup.transform.Find("Text").GetComponent<Text>().text = legend;
        runtime.pickup.transform.Find("Sprite").GetComponent<Image>().sprite = sprite;
        runtime.pickup.GetComponent<Button>().onClick.AddListener(() => CraftItem(runtime));
        return runtime.pickup;
    }

    public override void DropItem(ItemRuntime runtime)
    {
       // Do any housekeeping after item is dropped
    }
}

public class CraftableRuntime : ItemRuntime
{
    private CraftableItem craftable;
    public override Item Immutable { get { return craftable; } set { craftable = (CraftableItem)value; } }
}
Demo
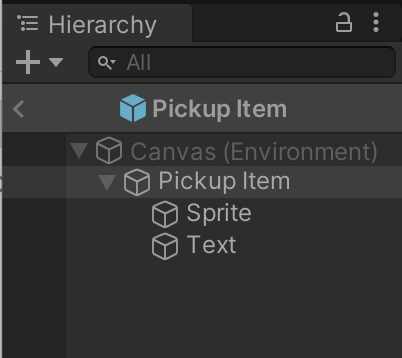
With our basic item types defined, we can start creating things. First of all, we need a simple UI prefab which we will use to represent the object in its various states.
For this demo it's simply a square image with a Button component with two children: one with a Text called Text, and another with an Image component called Sprite. Heirarchy looks like this:
Now we can define some Elements and some CraftableItems.
Either one can be created with the context menu by right clicking in the project pane:
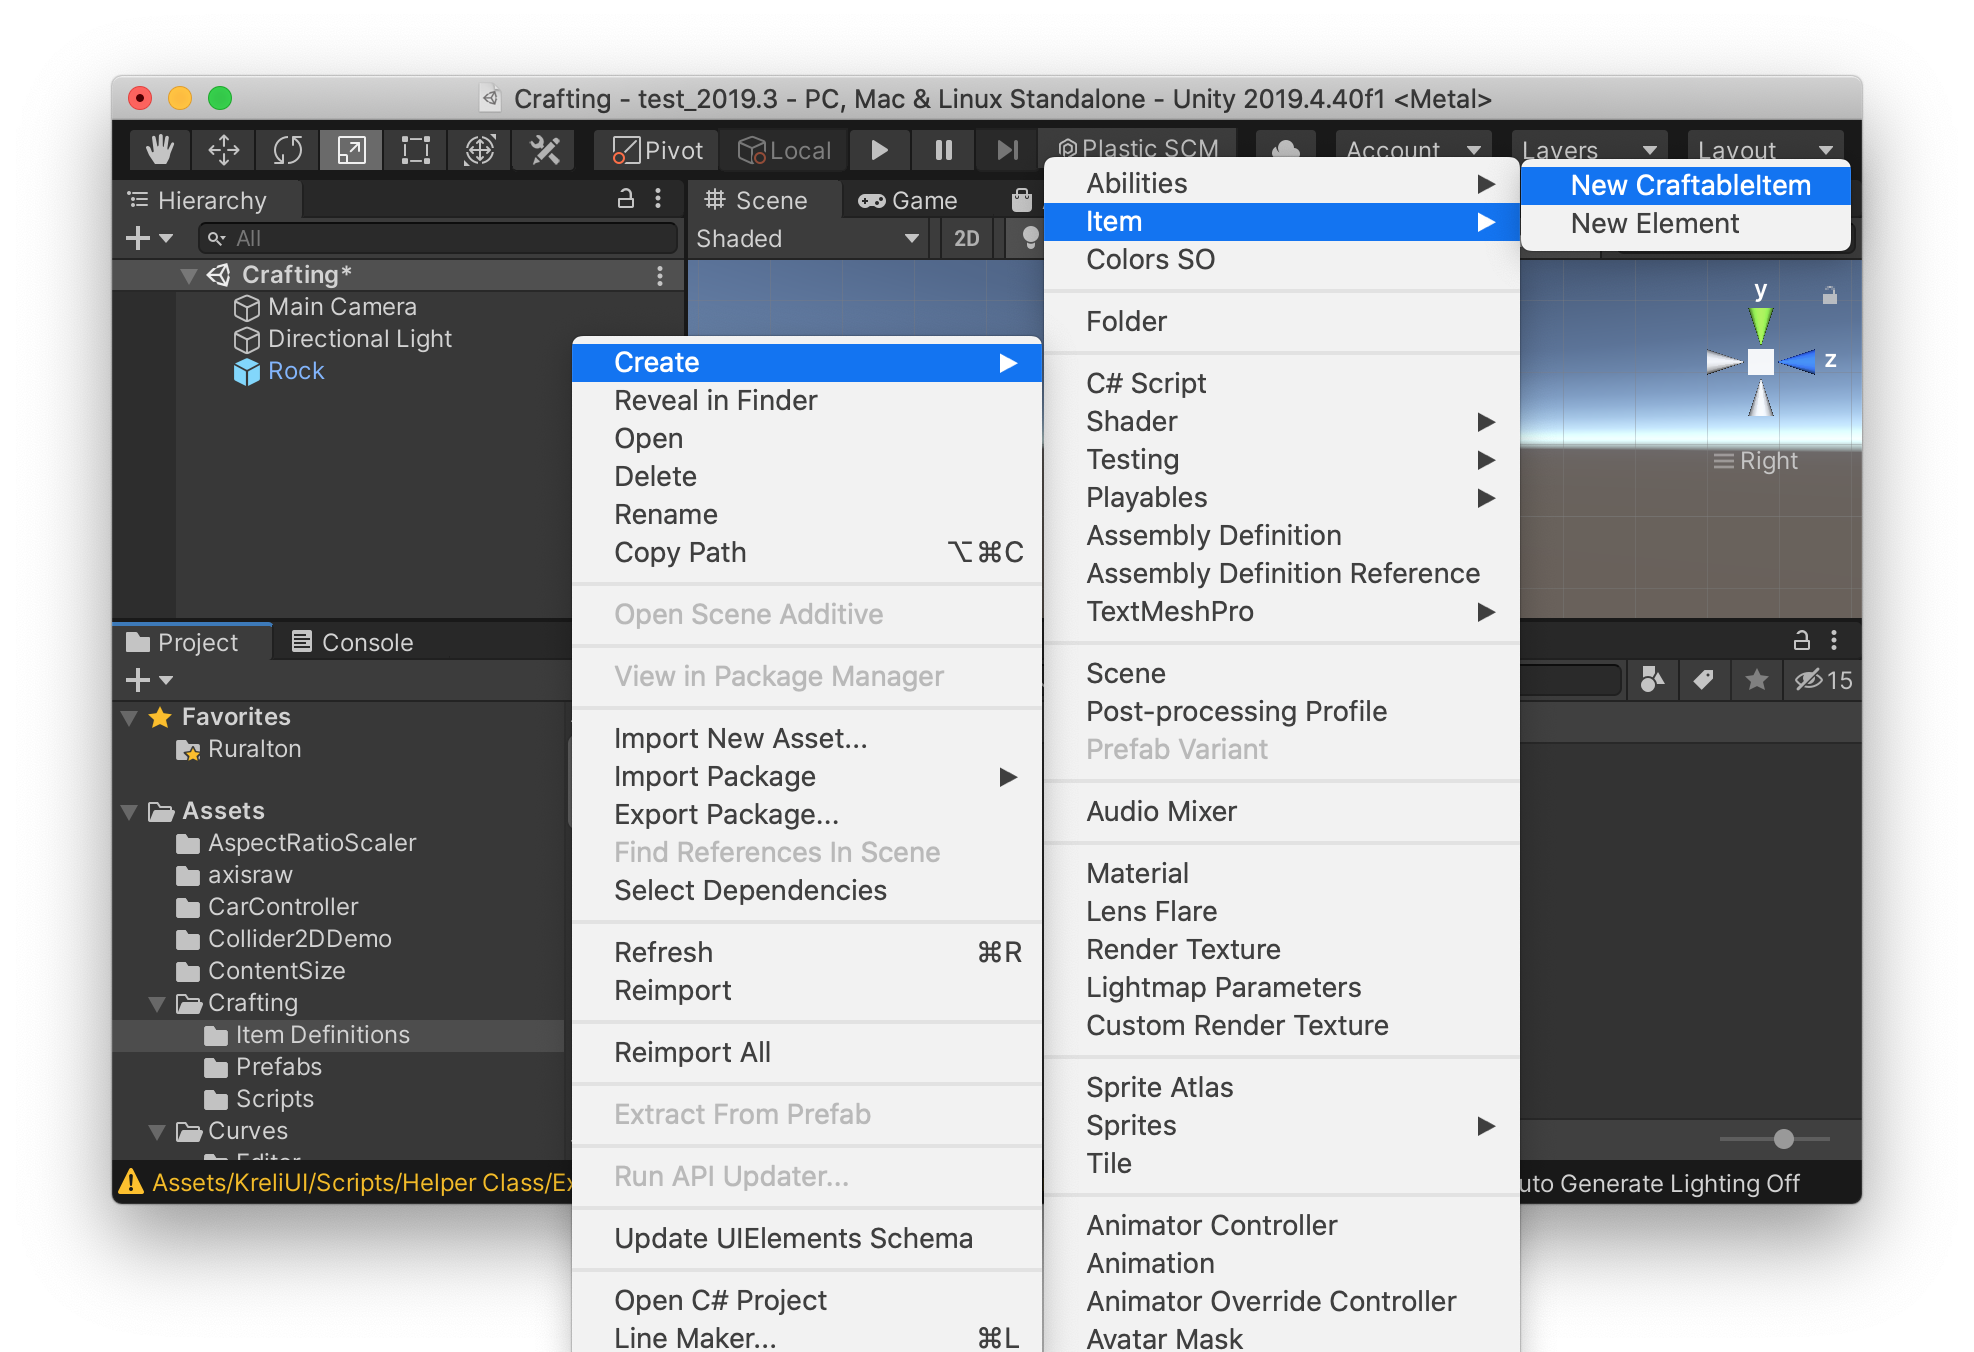
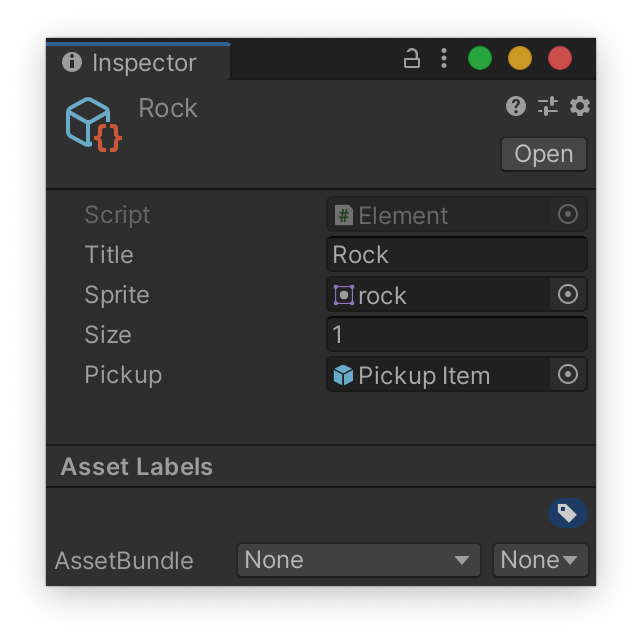
The result will be a new ScriptableObject that we can fill the details in in the inspector. For instance, this is the definition of an Element called "Rock":
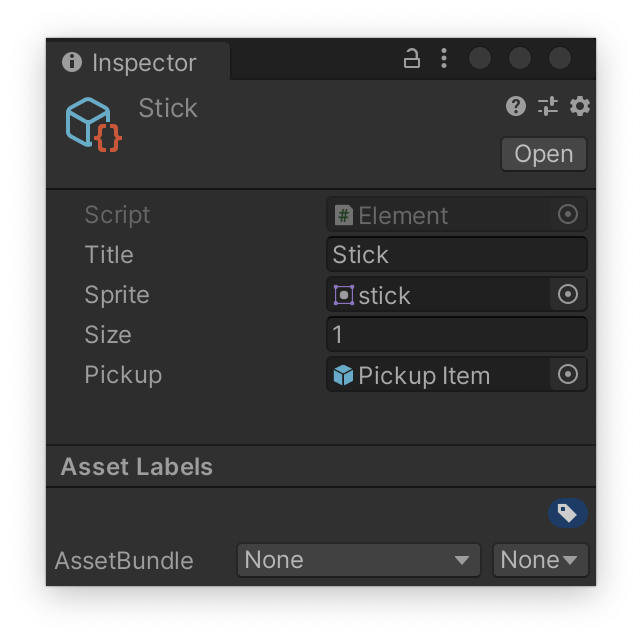
Let's also create an Element called "Stick":
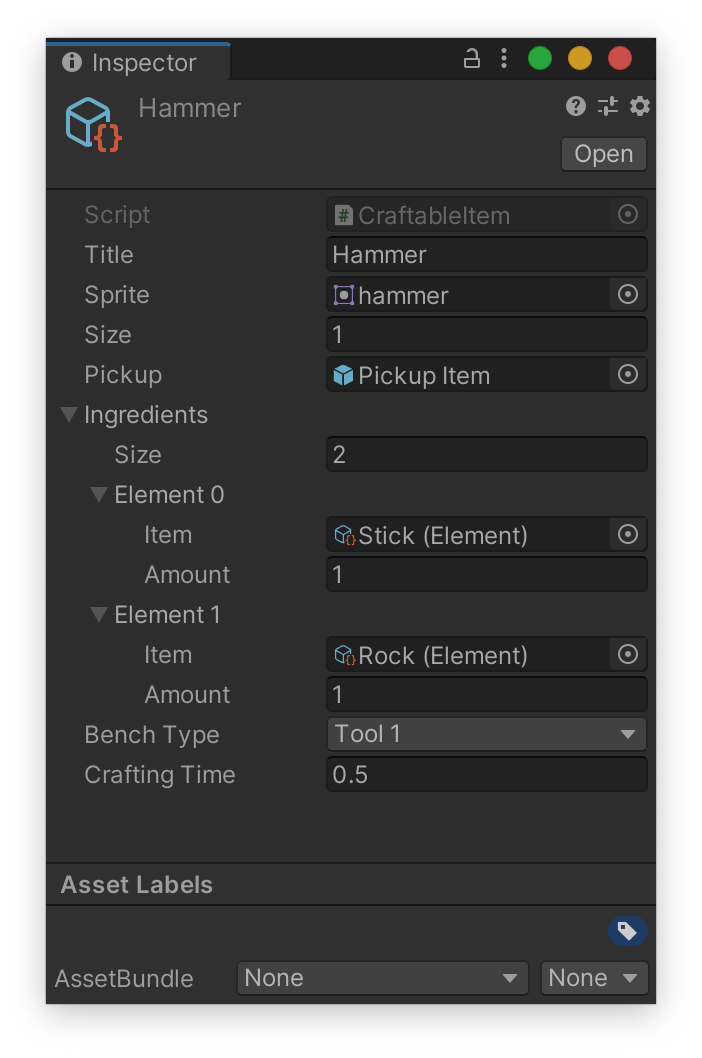
Next, let's create a CraftableItem called "Hammer." Craftable items have a few more fields to fill out. We'll say a hammer costs one stick and one rock, requires a basic tool bench, and takes .5 seconds to craft:
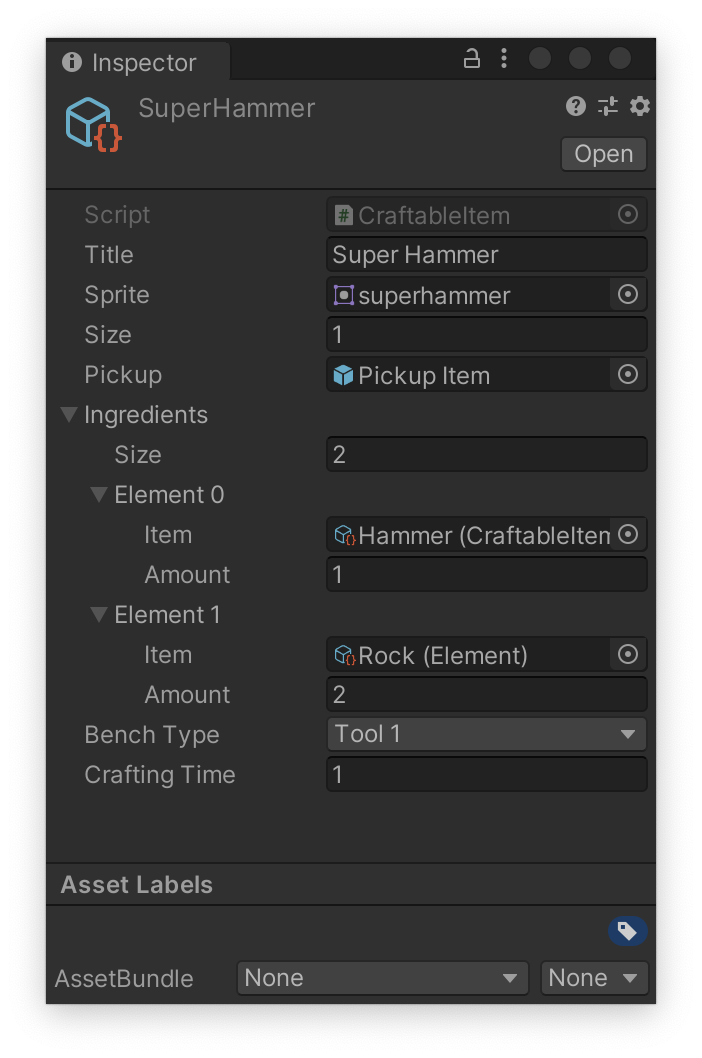
Let's create another Craftable, a super hammer that requires a regular hammer and two rocks to construct:
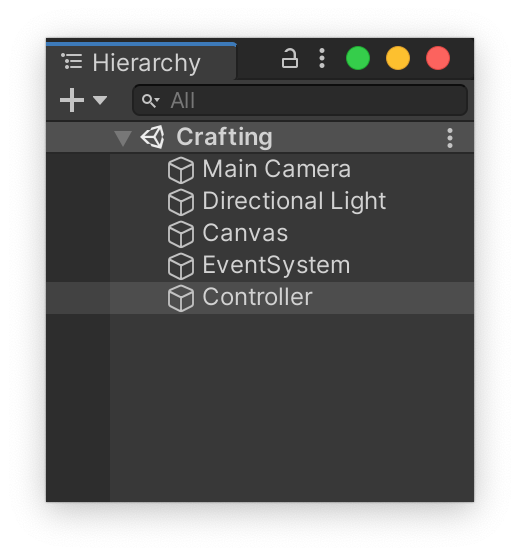
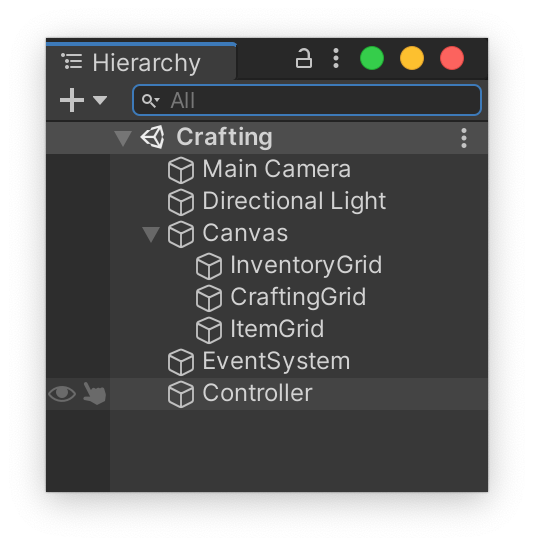
Now let's construct the scene. This will just be super basic -- Three UI grids, one to hold our current inventory, one for recipes that can be crafted, and another to hold items that can be picked up. Start by adding a Canvas Component (which should bring in an EventSystem along with it). We'll also need a new empty game object that we'll call Controller -- this will hold the singleton component that will be the glue for our demo.
Now, to the Canvas we'll create three empty children which we will call InventoryGrid, CraftingGrid and ItemGrid:
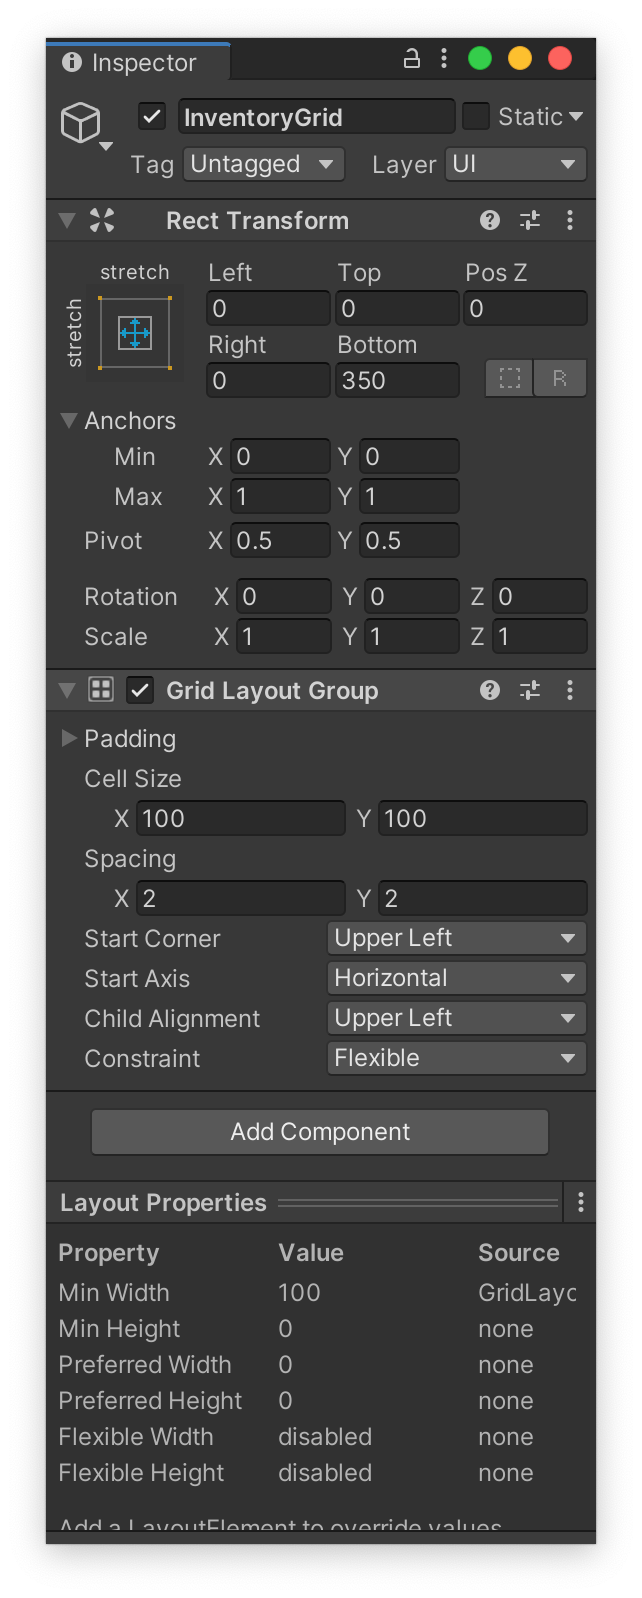
Each of these gameobjects will get a GridLayoutGroup component. They are configured similarly, one occupying the top, middle and bottom of the screen. Here's the config for the top grid object:
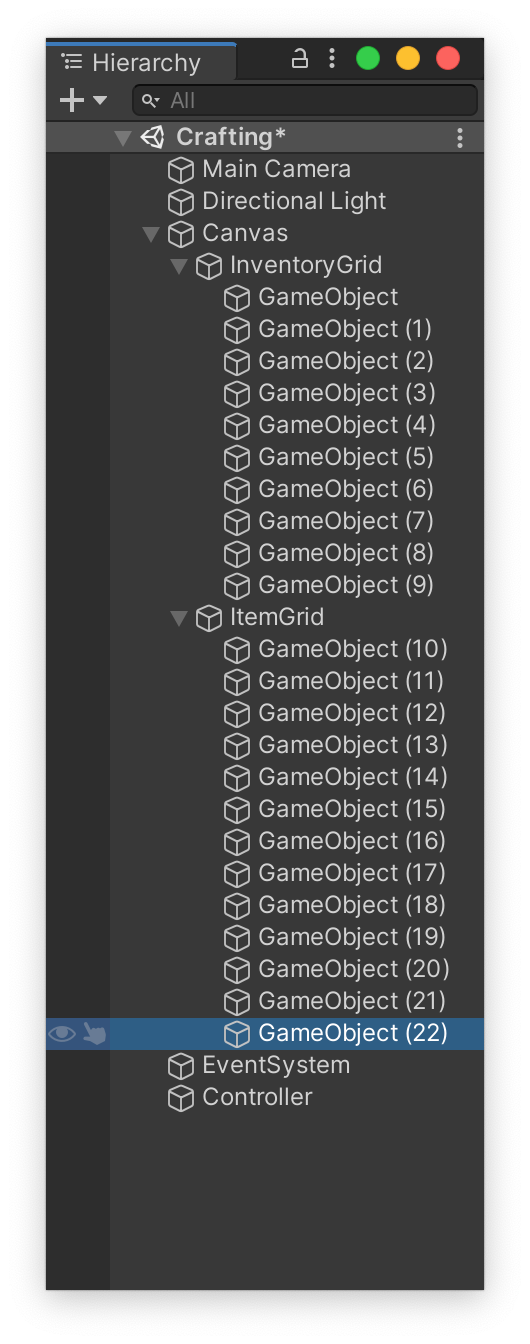
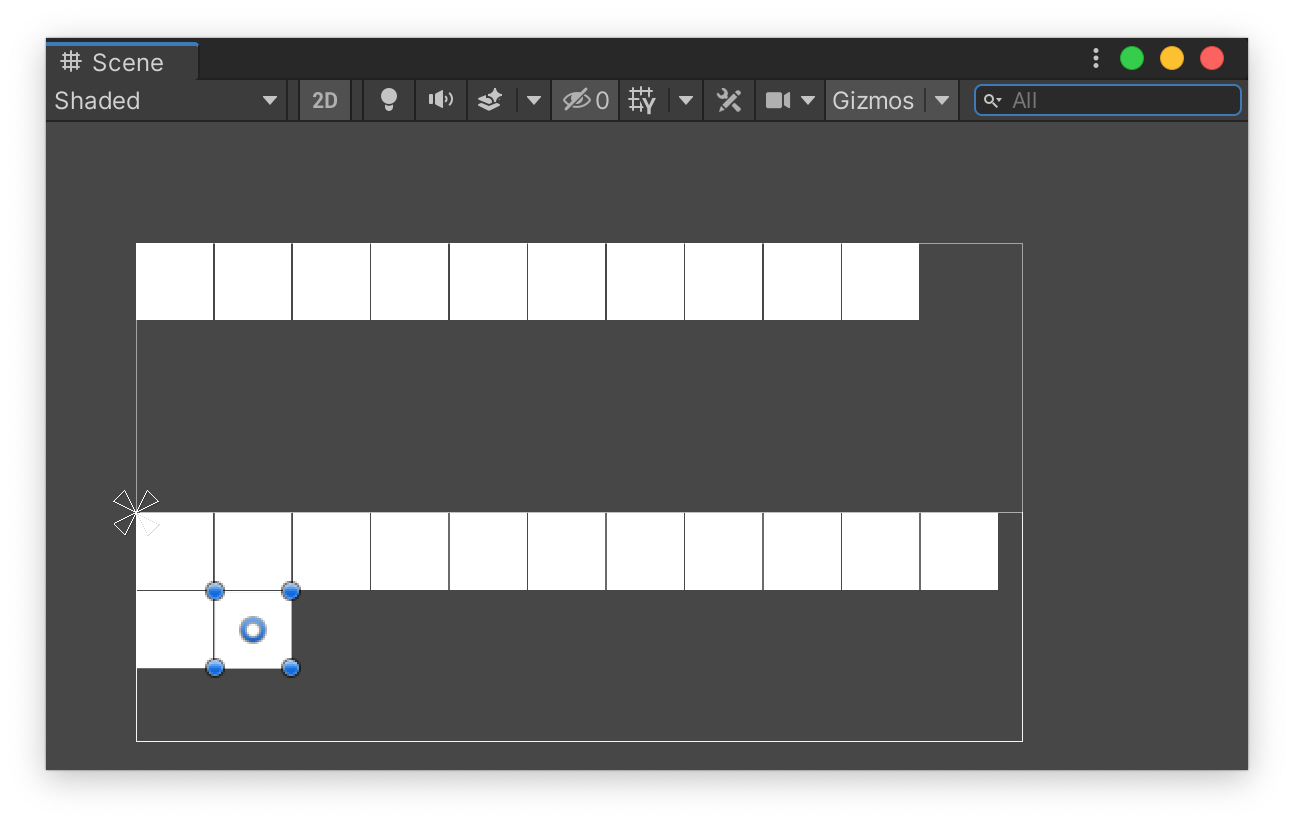
You can quickly test populate these grids with dummy children that have Image components to see how it looks:
Next up, a simple controller script that will be the glue for this demo:
using System.Collections;
using System.Collections.Generic;
using UnityEngine;
using UnityEngine.UI;
using CraftingStuff;

public class CraftingController : MonoBehaviour
{
    [Header ("Inventories")]
    public List<ItemRuntime> inventory = new List<ItemRuntime>();
    public List<ItemRuntime> worldItems = new List<ItemRuntime>();
    [Tooltip ("Items that will be constantly replenished")]
    [SerializeField] Item[] freeItems;
    [Tooltip("Items that can be crafted")]
    [SerializeField] CraftableItem[] recipes;

    [Header("UI Stuff")]
    [Tooltip ("parent transforms which generated UI elements will be childed")]
    [SerializeField] Transform inventoryUIParent;
    [SerializeField] Transform craftingUIParent;
    [SerializeField] Transform itemUIParent;

    public static CraftingController instance;

    void Awake()
    {
        instance = this; //Controller is a singleton
    }

    void Start()
    {
        PopulateRecipes();
    }


    void Update()
    {
        if(worldItems.Count < 10) //magic number for demo
        {
            GenerateFreeItem();
        }
    }

    void GenerateFreeItem()
    {
       var item = freeItems[Random.Range(0, freeItems.Length)];
        var itemRuntime = item.GenerateRuntime();
        worldItems.Add(itemRuntime);
        var t = item.InstantiatePickup(itemRuntime).transform;
        t.SetParent(itemUIParent);
        t.localScale = Vector3.one; //prevent weird UI scaling

    }

    public void AddItemToInventory(Transform inventoryObject, ItemRuntime itemRuntime)
    {
        inventoryObject.SetParent(inventoryUIParent);
        inventoryObject.localScale = Vector3.one;
        worldItems.Remove(itemRuntime);
        inventory.Add(itemRuntime);
    }

    void PopulateRecipes()
    {
        for (int i = 0; i < recipes.Length; i++)
        {
            var recipe = recipes[i];
            var recipe_rt = recipe.GenerateRuntime();
            var t = recipe.InstantiatePickup(recipe_rt).transform;
            t.SetParent(craftingUIParent);
            t.localScale = Vector3.one;
        }
    }

    public bool RecipeCheck(List<Ingredient> ingredients, BenchType benchType)
    {

        //Check ingredients are in inventory.
        //This is brute force and probably very inefficient:
        bool ingredientsPresent = true;
        for(int i = 0; i < ingredients.Count; i++)
        {
            int count = 0;
            bool ingredientPresent = false;
            for (int j = 0; j < inventory.Count; j++)
            {
                if(inventory[j].Immutable == ingredients[i].item)
                {
                    count++;
                    if(count == ingredients[i].amount)
                    {
                        ingredientPresent = true;
                        break;
                    }
                }
            }
            if (!ingredientPresent)
            {
                ingredientsPresent = false;
                break; //fail -- all ingredients not present in inventory
            }
        }
        return ingredientsPresent;
        //TODO bench check

    }

    public void AddCraftedItem(CraftableRuntime craftable_rt)
    {
        //Remove ingredients from inventory
        var ingredients = (craftable_rt.Immutable as CraftableItem).ingredients;
        for (int i = 0; i < ingredients.Count; i++)
        {
            for (int j = 0; j < ingredients[i].amount; j++)
            {
                var itemToRemove = inventory.Find(x => x.Immutable == ingredients[i].item);
                Destroy(itemToRemove.pickup); // Should pool instead, but for this demo...
                inventory.Remove(itemToRemove);
            }
        }
        StartCoroutine(CompleteCrafting(craftable_rt));
    }

    IEnumerator CompleteCrafting(CraftableRuntime craftable_rt)
    {
        var craftable = craftable_rt.Immutable as CraftableItem;
        yield return new WaitForSeconds(craftable.craftingTime);
        craftable.AddItem(craftable_rt);
    }
}
In Awake(), CraftingController creates a static reference to itself (simple singleton pattern) so that other objects can reference.
Start() populates the crafting bar, using an array of CraftableItems.
Update() replenishs the basic objects that can be picked up, by checking whether the number of existing objects is below a certain threshold.
GenerateFreeItem() actually creates the free items, with most of the actual work being done in the relevant Item script.
AddItemToInventory() is called by Item scripts when they have done the necessary housekeeping to add the item to the inventory and UI.
PopulateRecipes() is similar to GenerateFreeItem(), it's the scaffolding for a CraftableItem to be added to the CraftingGrid.
RecipeCheck() is called by CraftableItems when asked to craft. It's a bit of a brute force implementation to ensure the inventory contains the necessary ingredients. Checking for the proper BenchType is notional at this point; that's left for an exercise for the reader :)
AddCraftedItem() is called when RecipeCheck() passes; it deducts the ingredients from the inventory and then starts a coroutine which waits however many seconds the recipe requires before actually adding the crafted item to the inventory.
Going Further
This architecture pattern is simple to extend. For instance, you might want to further define a craftable weapon with properties for ammunition and methods for using it in combat. It's all up to you!


