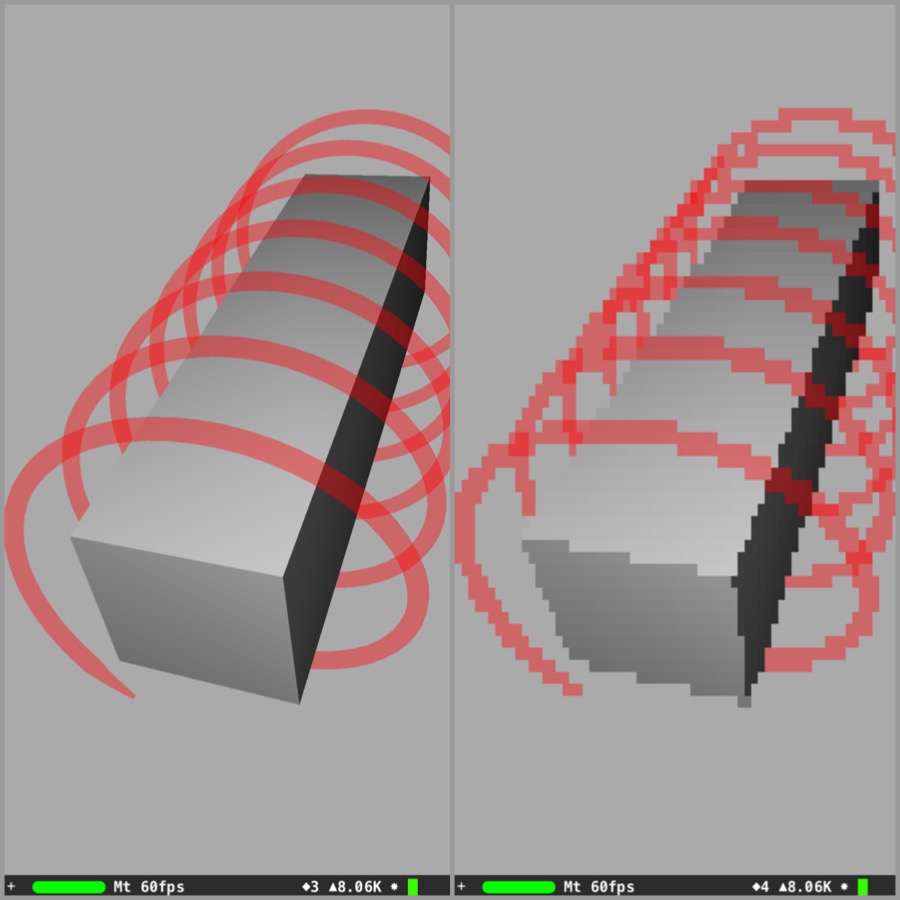
I don't think this is going to be quite as easy as you'd like, that said you should be able to copy/paste the code below to get something going.
There might be a better way to approach this, but as I see it you'll need 2 render passes. The first to render the scene to a low resolution to introduce pixelation, and a second to resample the low resolution render to the resolution of the screen. SCNTechnique is how multi-pass rendering is supported in SceneKit.
The following xml defines the rendering passes for this pixelate technique, add a plist file to you project (pixelate.plist) and paste this in.
<?xml version="1.0" encoding="UTF-8"?>
<!DOCTYPE plist PUBLIC "-//Apple//DTD PLIST 1.0//EN" "http://www.apple.com/DTDs/PropertyList-1.0.dtd">
<plist version="1.0">
    <dict>
        <key>passes</key>
        <dict>

            <key>pixelate_scene</key>
            <dict>
                <key>draw</key>
                <string>DRAW_SCENE</string>
                <key>inputs</key>
                <dict/>
                <key>outputs</key>
                <dict>
                    <key>color</key>
                    <string>color_scene</string>
                </dict>
                <key>colorStates</key>
                <dict>
                    <key>clear</key>
                    <true/>
                    <key>clearColor</key>
                    <string>sceneBackground</string>
                </dict>
            </dict>

            <key>resample_pixelation</key>
            <dict>
                <key>draw</key>
                <string>DRAW_QUAD</string>
                <key>program</key>
                <string>doesntexist</string>
                <key>metalVertexShader</key>
                <string>pixelate_pass_through_vertex</string>
                <key>metalFragmentShader</key>
                <string>pixelate_pass_through_fragment</string>
                <key>inputs</key>
                <dict>
                    <key>colorSampler</key>
                    <string>color_scene</string>
                </dict>
                <key>outputs</key>
                <dict>
                    <key>color</key>
                    <string>COLOR</string>
                </dict>
            </dict>


        </dict>
        <key>sequence</key>
        <array>
            <string>pixelate_scene</string>
            <string>resample_pixelation</string>
        </array>
        <key>targets</key>
        <dict>
            <key>color_scene</key>
            <dict>
                <key>type</key>
                <string>color</string>
                <key>size</key>
                <string>75x75</string>
            </dict>
        </dict>
        <key>symbols</key>
        <dict></dict>
    </dict>
</plist>
If you'd like to understand more about what's going on in this block of XML refer to the Apple docs, I'll only cover the specifics here. The sequence element defines the order of our two render passes; pixelate_scene and resample_pixelation. The definition of each pass is defined in the passes element.
With the DRAW_SCENE draw instruction and not setting any shaders to the pixelate_scene we tell SceneKit to simply render the scene to the output target (a texture) using its standard shaders. The target in this case color_scene is a color texture with a size of 75x75px, this is defined in the targets element at the end of the xml file.
The resample_pixelation pass is a bit different, as now we want to perform a rendering pass over the texture in color_scene. To do this we use the DRAW_QUAD draw instruction, with this SceneKit builds us a fullscreen quad on which our input texture is mapped. This time we do need to define a vertex and fragment shader.
It doesn't matter what .metal file you include this in, only the shader names do need to match those found in the plist definition.
#include <metal_stdlib>
using namespace metal;
#include <SceneKit/scn_metal>

struct custom_vertex_t
{
    float4 position [[attribute(SCNVertexSemanticPosition)]];
};

constexpr sampler s = sampler(coord::normalized,
                              address::repeat,
                              filter::nearest);

struct out_vertex_t
{
    float4 position [[position]];
    float2 uv;
};

vertex out_vertex_t pixelate_pass_through_vertex(custom_vertex_t in [[stage_in]],
                                                 constant SCNSceneBuffer& scn_frame [[buffer(0)]])
{
    out_vertex_t out;
    out.position = in.position;
    out.uv = float2((in.position.x + 1.0) * 0.5 , (in.position.y + 1.0) * -0.5);
    return out;
};

fragment half4 pixelate_pass_through_fragment(out_vertex_t vert [[stage_in]],
                                              texture2d<float, access::sample> colorSampler [[texture(0)]])
{
    float4 fragment_color = colorSampler.sample( s, vert.uv);
    return half4(fragment_color);
};
This is a simple Metal shader for our fullscreen quad. The vertex shader calculates the UV texture coordinates, and the fragment shader simply resamples the input texture (low res 75x75 texture) and writes it to the output. One thing to point out is in the sampler definition, using filter::nearest means that we'll get nice sharp pixels. You could also use something like filter::linear, but this would blur the pixels.
Lastly you'll need to apply this SCNTechnique.
if let path = NSBundle.mainBundle().pathForResource("pixelate", ofType: "plist") {
    if let plistDict = NSDictionary(contentsOfFile: path)  {
        let plistStrDict = plistDict as! [String : AnyObject]
        let pixelateTechnique = SCNTechnique(dictionary:plistStrDict)
        scnView.technique = pixelateTechnique
    }
}
And if all goes according to plan...

Source code for this can be found in my GitHub repo, just make sure you check out the pixelate branch.

