0
\$\begingroup\$

I am trying to follow a shader tutorial from 2016 for unity.

I reached the point where the author is distorting the text by changing OUT.wordPosition

    v2f vert(appdata_t v)
    {
        v2f OUT;
        UNITY_SETUP_INSTANCE_ID(v);
        UNITY_INITIALIZE_VERTEX_OUTPUT_STEREO(OUT);
        float4 vPosition = UnityObjectToClipPos(v.vertex);

        float4 offset = float4(
            0, 
            tex2Dlod(_NoiseTex, float4(v.vertex.x / 1000, 0,0,0)).r,
            0, 
            0);
        OUT.worldPosition = v.vertex + offset;
        OUT.vertex = vPosition ;

I am trying to follow this code but any changes I make to OUT.worldPosition has no effect. Even if I just set it to 0 the test still displays without any change.

I know that the rest of my code works correctly. If I instead of OUT.worldPosition change OUT.vertex there is an imact on the text, if not the desired effect.

The biggest difference between me and the tutorial author is that he is using unity 5.3.4 for the base code of his shader. As I am using Unity 2020.2 I used the Unity 2020.2 as the base of my shader code, and worked around the differences.

For some reason I just can't manipulate worldPosition .

Here is the tutorial I am following https://www.youtube.com/watch?v=VZOetdCvFTg

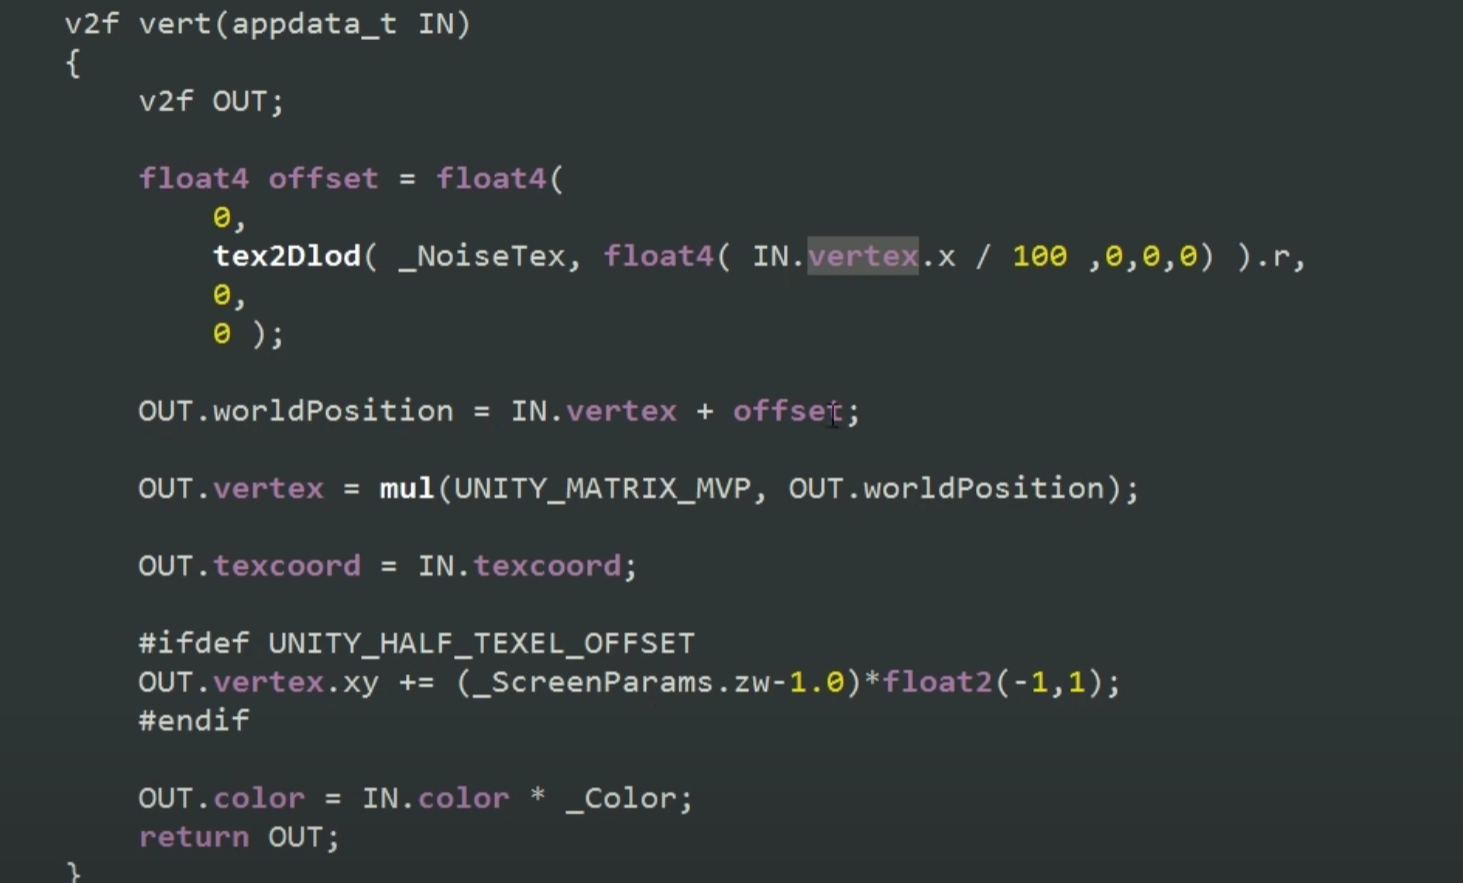
Snippet of his working code enter image description here

Are there changes in Unity 202 requiring me to do anything different? Am I doing something else wrong?

Here is my complete code for the shader

Shader "Unlit/TextShader"
{
    Properties
    {
        [PerRendererData] _MainTex ("Sprite Texture", 2D) = "white" {}
        _Color ("Tint", Color) = (1,1,1,1)

        _StencilComp ("Stencil Comparison", Float) = 8
        _Stencil ("Stencil ID", Float) = 0
        _StencilOp ("Stencil Operation", Float) = 0
        _StencilWriteMask ("Stencil Write Mask", Float) = 255
        _StencilReadMask ("Stencil Read Mask", Float) = 255

        _ColorMask ("Color Mask", Float) = 15
        _NoiseTex ("Noise Texture",2D)="white"

        _DistortionDamer ("Distortion Damper",float)=10
        _DistortionSpread ("Distortion Spread",float)=50

        [Toggle(UNITY_UI_ALPHACLIP)] _UseUIAlphaClip ("Use Alpha Clip", Float) = 0
    }

    SubShader
    {
        Tags
        {
            "Queue"="Transparent"
            "IgnoreProjector"="True"
            "RenderType"="Transparent"
            "PreviewType"="Plane"
            "CanUseSpriteAtlas"="True"
        }

        Stencil
        {
            Ref [_Stencil]
            Comp [_StencilComp]
            Pass [_StencilOp]
            ReadMask [_StencilReadMask]
            WriteMask [_StencilWriteMask]
        }

        Cull Off
        Lighting Off
        ZWrite Off
        ZTest [unity_GUIZTestMode]
        Blend One OneMinusSrcAlpha
        ColorMask [_ColorMask]

        Pass
        {
            Name "Default"
        CGPROGRAM
            #pragma vertex vert
            #pragma fragment frag
            #pragma target 2.0

            #include "UnityCG.cginc"
            #include "UnityUI.cginc"

            #pragma multi_compile_local _ UNITY_UI_CLIP_RECT
            #pragma multi_compile_local _ UNITY_UI_ALPHACLIP

            struct appdata_t
            {
                float4 vertex   : POSITION;
                float4 color    : COLOR;
                float2 texcoord : TEXCOORD0;
                UNITY_VERTEX_INPUT_INSTANCE_ID
            };

            struct v2f
            {
                float4 vertex   : SV_POSITION;
                fixed4 color    : COLOR;
                float2 texcoord  : TEXCOORD0;
                float4 worldPosition : TEXCOORD1;
                half4  mask : TEXCOORD2;
                UNITY_VERTEX_OUTPUT_STEREO
            };

            sampler2D _MainTex;
            sampler2D _NoiseTex;
            float _DistortionDamer;
            float _DistortionSpread;


            fixed4 _Color;
            fixed4 _TextureSampleAdd;
            float4 _ClipRect;
            float4 _MainTex_ST;
            float _UIMaskSoftnessX;
            float _UIMaskSoftnessY;

            v2f vert(appdata_t v)
            {
                v2f OUT;
                UNITY_SETUP_INSTANCE_ID(v);
                UNITY_INITIALIZE_VERTEX_OUTPUT_STEREO(OUT);
                float4 vPosition = UnityObjectToClipPos(v.vertex);
    
                float4 offset = float4(
                    0, 
                    tex2Dlod(_NoiseTex, float4(v.vertex.x / 100, 0,0,0)).r,
                    0, 
                    0);
                OUT.worldPosition = v.vertex + offset;         
                OUT.vertex = vPosition ;

                float2 pixelSize = vPosition.w;
                pixelSize /= float2(1, 1) * abs(mul((float2x2)UNITY_MATRIX_P, _ScreenParams.xy));

                float4 clampedRect = clamp(_ClipRect, -2e10, 2e10);
                float2 maskUV = (v.vertex.xy - clampedRect.xy) / (clampedRect.zw - clampedRect.xy);
                OUT.texcoord = TRANSFORM_TEX(v.texcoord.xy, _MainTex);
                OUT.mask = half4(v.vertex.xy * 2 - clampedRect.xy - clampedRect.zw, 0.25 / (0.25 * half2(_UIMaskSoftnessX, _UIMaskSoftnessY) + abs(pixelSize.xy)));

                OUT.color = v.color * _Color;
                return OUT;
            }

            fixed4 frag(v2f IN) : SV_Target
            {
    
                half4 color = IN.color * (tex2D(_MainTex, IN.texcoord) + _TextureSampleAdd);
                #ifdef UNITY_UI_CLIP_RECT
                half2 m = saturate((_ClipRect.zw - _ClipRect.xy - abs(IN.mask.xy)) * IN.mask.zw);
                color.a *= m.x * m.y;
                #endif

                #ifdef UNITY_UI_ALPHACLIP
                clip (color.a - 0.001);
                #endif

                color.rgb *= color.a;

                return color;
            }
        ENDCG
        }
    }
}
\$\endgroup\$
4
  • 1
    \$\begingroup\$ Your vertex shader saves a value into the texture coordinate channel named worldPosition, but never uses it to adjust the placement of the vertex on screen (the float4 vertex : SV_POSITION; variable), and never reads its value in the fragment shader. What are you planning to do with that variable? You can see in the tutorial code, they use it as an input to modify vertex - did you try doing that? \$\endgroup\$
    – DMGregory
    Commented Feb 15, 2021 at 20:48
  • \$\begingroup\$ @DMGregory I have tried modifying vertex. It modifies the render, but related to the camera, instead of in world space. I am looking at the original unity shader. They also just modify worldPosition as OUT.worldPosition = v.vertex; and then don't do anything with it. Unfortunately as I am just learning shader programming, i don't get much of what is going out outside of v2f and frag \$\endgroup\$
    – Andrey
    Commented Feb 15, 2021 at 21:00
  • \$\begingroup\$ The screenshot you show says OUT.vertex = mul(UNITY_MATRIX_MVP, OUT.worldPosition); so no, it is not true that they don't do anything with it. They use it as an input to modify vertex, as I stated in my previous comment. \$\endgroup\$
    – DMGregory
    Commented Feb 15, 2021 at 21:04
  • \$\begingroup\$ @DMGregory OK i got it working. So the takeaway here is that while worldPosition is part of the OUT struct, it's just used as a local variable to calculate vertex. Unity moved this code around to do the calculation higher up, breaking the tutorial's code. Working code looks like this OUT.worldPosition = v.vertex + offset*100; float4 vPosition = UnityObjectToClipPos(OUT.worldPosition); OUT.vertex = vPosition; Do you want to make this into an answer I can accept? I think it is helpful to others that follow older shader tutorials \$\endgroup\$
    – Andrey
    Commented Feb 15, 2021 at 22:57

1 Answer 1

1
\$\begingroup\$

The name "worldPosition" doesn't have any particular meaning to a shader. It's just a nickname you've given to a particular variable, and naming it that doesn't actually cause it to control the world space position of the vertex.

What gives meaning to these variables are the tags after the colons in this structure:

struct v2f
{
    float4 vertex   : SV_POSITION;
    fixed4 color    : COLOR;
    float2 texcoord  : TEXCOORD0;
    float4 worldPosition : TEXCOORD1;
    half4  mask : TEXCOORD2;
    UNITY_VERTEX_OUTPUT_STEREO
};

Or here:

fixed4 frag(v2f IN) : SV_Target
{
    //...
}

These labels are called "Semantics", and they're the shipping labels that tell the graphics pipeline where to send each piece of data and what to do with it.

The TEXCOORD1 semantic on worldPosition means the graphics pipeline will treat this as an extra channel of UV data, piping it through to the fragment shader to do its texturing work. But it won't actually accomplish anything on its own unless you write code that reads and acts on it.

The semantic that controls the rendered on-screen position of the vertex is SV_POSITION. So if we want to modify where a vertex is drawn, our data needs to somehow make its way to the variable with that semantic, specifically OUT.vertex in your vertex shader.

In the tutorial code you screenshotted, that's accomplished with these two lines:

OUT.worldPosition = IN.vertex + offset;
OUT.vertex = mul(UNITY_MATRIX_MVP, OUT.worldPosition);

Here we not only assign a value to our world position variable, we also use that value to update the vertex output, that ultimately drives the projected vertex position we see on the screen via the SV_POSITION semantic.

Minor quibble: unless this is in a batch, worldPosition here is actually an object space position. To make a world space position, we should write something more like...

OUT.worldPosition = mul(unity_ObjectToWorld(IN.vertex) + offset;
OUT.vertex = mul(UNITY_MATRIX_VP, OUT.worldPosition);

This separates out the object-to-world matrix multiplication as an initial step, then applies the view and projection multiplications separately.

So, moral of the story: if you're following a tutorial, follow it completely. It does not suffice to copy the same variable names. You also need to make use of the values in those variables to get the effect shown in the tutorial.

\$\endgroup\$
2
  • \$\begingroup\$ Just to be clear, the tutorial did not deal with that part of the code. This change of using UnityObjectToClipPos is one of at least a dozen changes to the shader between 2016 and 2020. Unfortunately unity is always a moving target, and 90% of all tutorials are out of date and require some tweaks to work \$\endgroup\$
    – Andrey
    Commented Feb 16, 2021 at 14:12
  • \$\begingroup\$ You are not obligated to use UnityObjectToClipPos (and doing so would not be appropriate in general for a vertex in world space rather than object space, hence the name). So the tutorial's approach of multiplying the matrix manually is still valid in Unity 2020. \$\endgroup\$
    – DMGregory
    Commented Feb 16, 2021 at 14:28

You must log in to answer this question.

Not the answer you're looking for? Browse other questions tagged .