5
\$\begingroup\$

How can I maintain crisp, sharp edges on sprites, while avoiding the aliasing caused by rotation?

None of the things I've tried produce a pixel-perfect non-rotated block, while allowing rotation without aliasing

Click here for the sample project, which also has some extra images in it.

Click here for my Unity Forums Thread


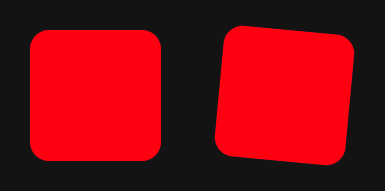
Ideally, this is what it would look like

From Photoshop, not Unity.

  • Flawless edges, smooth corners, and very faint aliasing when rotated.

enter image description here

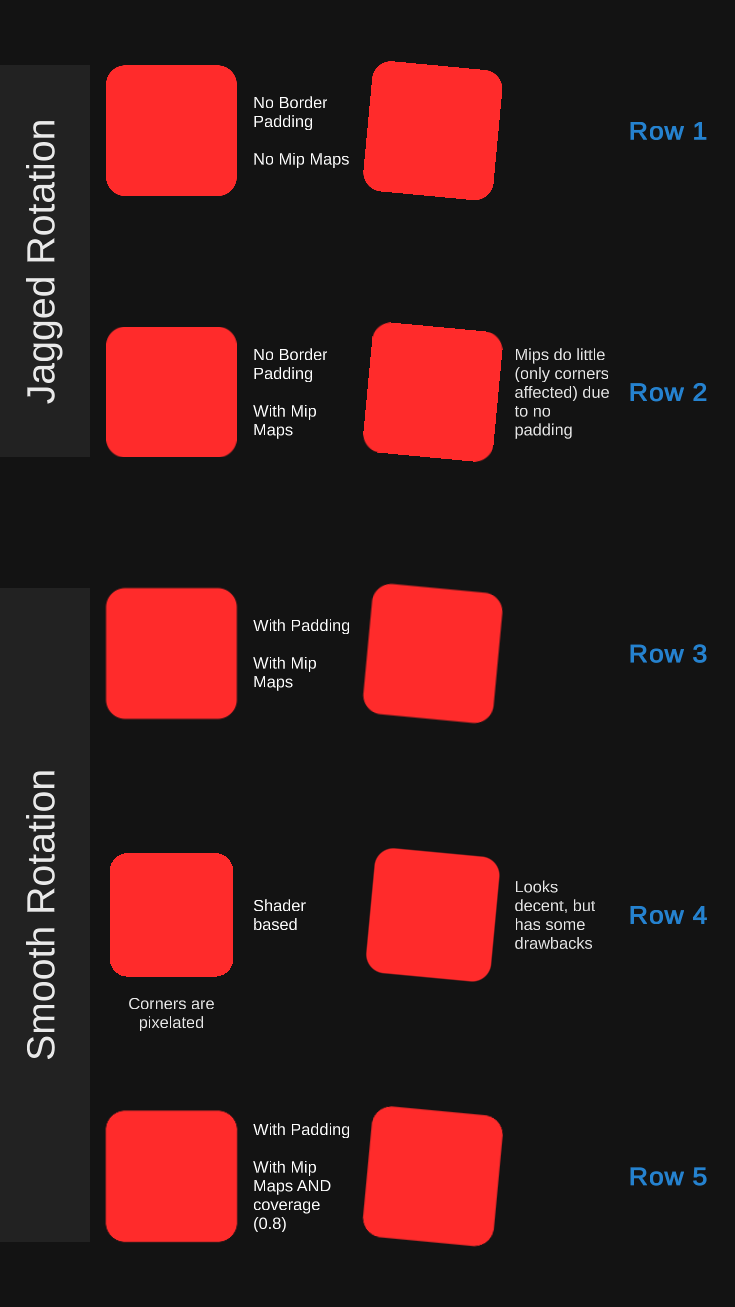
Screenshot from Github project:

Screenshot

Row 1

Non-rotated: Perfect edges, pixelated corners

Rotated: Pixelated everywhere


Row 2

Non-rotated: Perfect edges, smooth corners.

Rotated: Pixelated edges, smooth corners


Row 3

Non-rotated: Blurry everywhere.

Rotated: Blurry everywhere


Row 4

Non-rotated: Not quite perfect edges, pixelated corners

Rotated: Blurry everywhere


Row 5 (MY BEST SOLUTION SO FAR)

Non-rotated: Semi-blurry everywhere.

Rotated: Semi-blurry everywhere


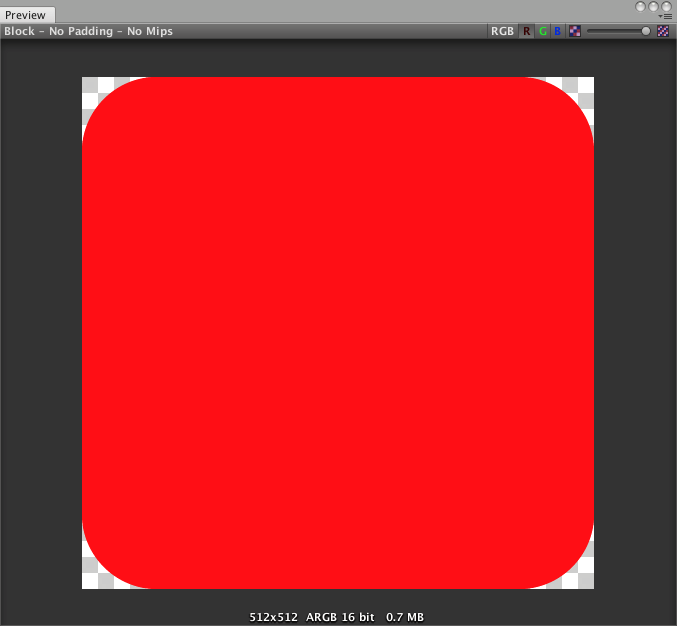
Texture for "no border padding" texture:

No padding

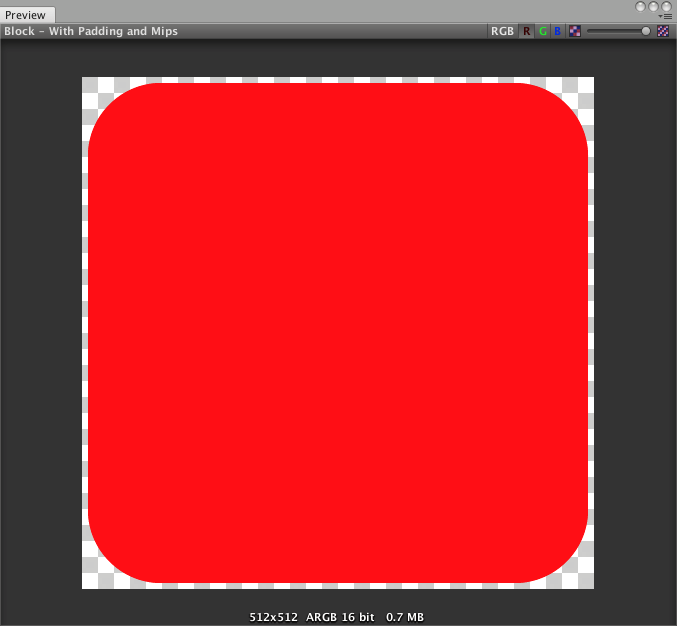
Texture for "with padding" texture:

Padding


Shader Method

(Note: I'm a total shader newbie)

I created a fragment shader to draw the block.

It has AA (via smoothstep) built in, and throttles it on as block is rotated (so that there is no AA when it's not rotated)

This has some problems:

  1. A (geometry) shader doesn't seem like the correct solution for this problem at all, since I'd have to make a shader for all the geometry that has this problem.

    • But maybe there is a shader that can apply AA to a texture, that doesn't do anything for vertical or horizontal (non-rotated) edges?
  2. Corners of block with AA turned off are pixelated

    • This doesn't seem too difficult to fix
    • I'd probably want it to work identically to row 2 (non-rotated)
  3. Not sure how much AA to apply (when rotated) so that it's as sharp as possible for a given screen DPI.

    • I thought this is what mip maps were good for, since the highest possible res texture should be chosen. (Another reason why a texture-based solution seems best)

Other things I've tried:

Vector graphics (per Unity's vector package)

  • Unity's vector package required 4x MSAA to look right, which was too intensive for mobile devices

MSAA

  • Creates blurry graphics (is there a way around this?)
\$\endgroup\$
6
  • \$\begingroup\$ Do you strictly need single-colour shapes like this, or might this need to apply to full colour images? What filtering mode are you using in these examples? \$\endgroup\$
    – DMGregory
    Commented Mar 27, 2019 at 22:27
  • \$\begingroup\$ Single color is good enough. These are bilinear. Point is crazy pixelated, and trilinear does little, and is blurrier if anything. \$\endgroup\$
    – Drin
    Commented Mar 27, 2019 at 22:29
  • \$\begingroup\$ If this is meant for single-colour simple shapes, did you consider vector graphics? \$\endgroup\$ Commented Mar 28, 2019 at 10:44
  • \$\begingroup\$ Yep. I almost had it all working using the Unity vector package, but it requires 4x MSAA, which was too intensive for mobile. :( \$\endgroup\$
    – Drin
    Commented Mar 28, 2019 at 12:33
  • \$\begingroup\$ Use compression format RGBA 32 bit \$\endgroup\$
    – Saad Anees
    Commented Mar 28, 2019 at 13:08

1 Answer 1

3
\$\begingroup\$

I'd be tempted to solve this with a Signed Distance Field.

Here we swap our original texture with one where the brightness value represents how far we are inside/outside the shape.

I set one up quickly to test with using the stroke layer effect in Photoshop:

Creating SDF image in Photoshop

I saved this as a single-channel greyscale image, imported uncompressed to avoid errors.

Now in our shader, we can use the value read from this texture, along with the partial derivatives from adjacent fragments, to estimate how many screen pixels we are from the true boundary, and shade the pixel accordingly. Here's the SDF shader I used for this test, which plays nicely with Unity's built-in sprite rendering:

Shader "Sprites/SDF Sprite"
{
    Properties
    {
        _MainTex ("Texture", 2D) = "white" {}
        _Color("Tint", Color) = (1,1,1,1)
        _Sharpness("Sharpness", Range(0.01, 1)) = 1.0
    }
    SubShader
    {
        // Duplicate normal sprite shader behaviours.
        // (I skipped implementing split alpha though)
        Tags
        {
            "Queue" = "Transparent"
            "IgnoreProjector" = "True"
            "RenderType" = "Transparent"
            "PreviewType" = "Plane"
            "CanUseSpriteAtlas" = "True"
        }

        Cull Off
        Lighting Off
        ZWrite Off
        Blend One OneMinusSrcAlpha

        Pass
        {
            CGPROGRAM
            #pragma vertex vert
            #pragma fragment frag
            #include "UnityCG.cginc"

            struct appdata
            {
                float4 vertex : POSITION;
                float4 color : COLOR;
                float2 uv : TEXCOORD0;              
            };

            struct v2f
            {                
                float4 vertex : SV_POSITION;
                fixed4 color : COLOR;
                float2 uv : TEXCOORD0;              
            };

            sampler2D _MainTex;
            fixed4 _Color;
            float _Sharpness;

            v2f vert (appdata v)
            {
                v2f o;
                o.vertex = UnityObjectToClipPos(v.vertex);
                o.uv = v.uv;
                o.color = v.color * _Color;
                o.color.rgb *= 2.0f;

                return o;
            }

            fixed4 frag (v2f i) : SV_Target
            {
                float sdf = tex2D(_MainTex, i.uv).r - 0.5f;

                float2 gradient = float2(ddx(sdf), ddy(sdf));
                float speed = length(gradient);
                float distance = sdf / speed;
                float coverage = saturate(distance * _Sharpness + 0.5f);


                fixed4 color = i.color;

                color.a *= coverage * coverage * (3.0 - 2.0f * coverage);

                color.rgb *= color.a;

                return color;
            }
            ENDCG
        }
    }
}

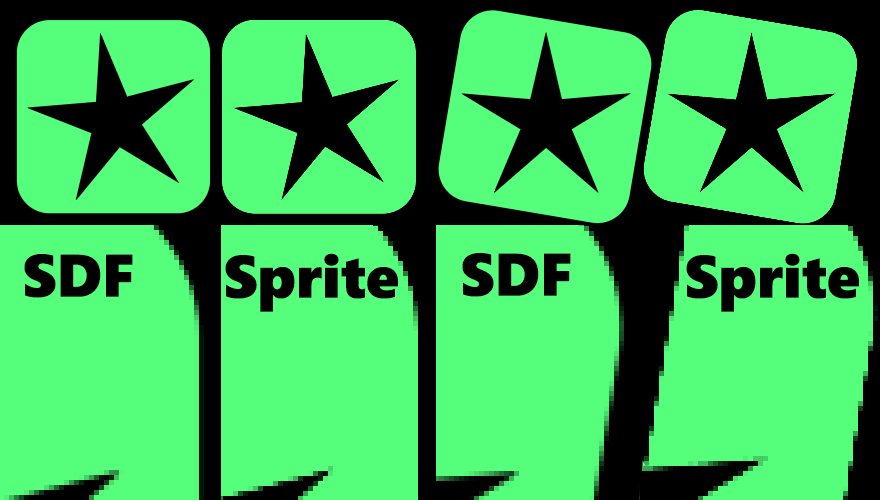
Comparing this against a standard sprite at the same resolution, with the SDF shader's Sharpness parameter tuned to 0.7:

SDF vs Sprite Comparison

And with SDF, we get the bonus win that we can scale the object larger / zoom in closer before we start to see ugly interpolation artifacts:

SDF on the left, regular sprite on the right, at the same zoom

One thing I noted during this test was that if I ensured both sprites were displayed at a 1:1 screen pixel to sprite texel scale ratio, both looked identically well anti-aliased. I had to muck with my camera/window a bit to force a non-integer ratio before the sharp stairstep aliasing artifacts started to creep in with the regular sprite. So, that suggests another possible fix: if you can ensure the regular sprites are drawn at 1:1 scale in screen pixels, then you might not need to do anything fancy in the rendering at all.

\$\endgroup\$

You must log in to answer this question.

Not the answer you're looking for? Browse other questions tagged .