1
\$\begingroup\$

What is the ideal way to set up 9-slicing?

(for the people who don't know what 9-slicing is)

Let's say we have a quad, with a texture applied to it. 9-slicing is basically a way of dividing a texture in 9 parts. The reason why we do this is to have a quad with a texture, that can be resized without the issue of having the texture all warped. we divide the edges, the corners, and the main body of the texture:
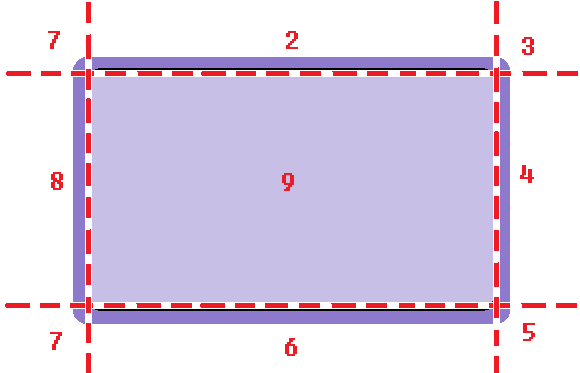
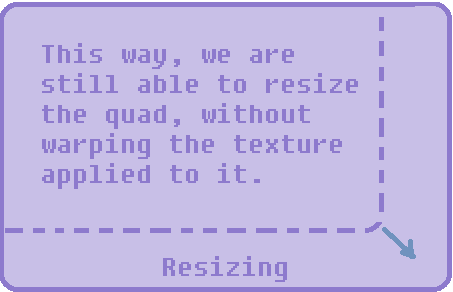
As can be seen in the pictures, we have a quad that can be scaled without warping the texture
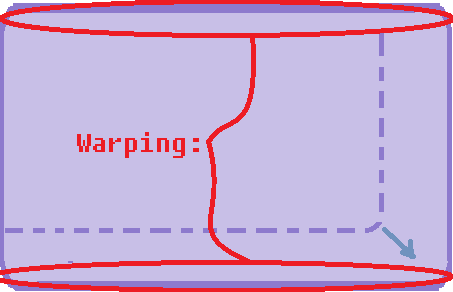
which would look something like this(no 9-slicing):
Now, to come back to my question: How should i set up 9-slicing? should i have a multiple quads(one for the center part, one for the right edge, one for the left edge....) but then how do i specify the different texture coordinates for each quad? Another way would be to just create the quads with their texture coordinates and relative textures and then move them all toghether like a whole object. I hope someone explain me a little more about this "9 slicing" approach, since I've never used it before. Thanks everyone for the help

EDIT: (to answer HolyBlackCat)

"Another way would be to just create the quads with their texture coordinates and relative textures and then move them all toghether like a whole object."

What i wanted to say is this: I create separate quads, attach separate textures to them, render and move them at the same time:
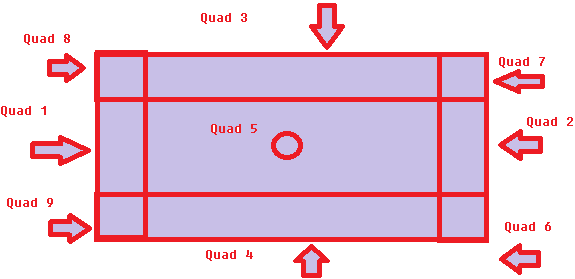
This is, in my opinion, the most logical way to do this. Despite that, I still want to know what would be a better, faster way to do this, without having to have too many vertices for a quad

\$\endgroup\$
7
  • 1
    \$\begingroup\$ Surely you need 9 quads. "how do i specify the different texture coordinates for each quad" What do you mean? It's no different from drawing a single textured quad 9 times. "Another way would be to just create the quads with their texture coordinates and relative textures and then move them all toghether like a whole object" I don't understand this part, can you elaborate? \$\endgroup\$ Commented Feb 1, 2018 at 20:47
  • \$\begingroup\$ @HolyBlackCat (to answer the first thing) Textures coordinates range from 0,0 to 1,1 right? even if I do specify the texture coordinates for each quad, how do i assign the different textures to the correct quad? \$\endgroup\$
    – user100681
    Commented Feb 1, 2018 at 20:56
  • \$\begingroup\$ Replying to the edit: Either way you end up with 9 quads. Making 9 textures looks like a waste to me, I would use a single one. Also it's easier to draw it this way. "how do i assign the different textures to the correct quad" I still don't understand the question. Are you asking how to convert pixel coordinates for a texture to the 0,0 .. 1,1 range? Or do you understand how to do that, but rather ask how to compute those coordinates for 9-slicing? Or do you ask how quad corners should be positioned? \$\endgroup\$ Commented Feb 1, 2018 at 21:21
  • \$\begingroup\$ @HolyBlackCat i want to understand how to conpute the texture coordinates for 9 slicing. Otherwise, i would have to define both vertices and texture coordinates by myself. Once i am able to compute the texture coordinates, how do i use multiple textures? I mean, how do i wrap to each qua a different texture? And how should i pass it to the fragment shader? At this point i think using 9 different quads would be the easies way... \$\endgroup\$
    – user100681
    Commented Feb 1, 2018 at 21:29
  • \$\begingroup\$ Again, you have to use 9 quads. You can write an intricate shader that will do it on a single quad instead, but that seems like an overkill. "how do i use multiple textures" Again, don't use multiple textures, use a single one. Do you understand how draw a single textured quad, but using not an entire texture, but rather an arbitrary rectangular portion of a texture? \$\endgroup\$ Commented Feb 1, 2018 at 22:06

1 Answer 1

1
\$\begingroup\$

The 2 methods (using 1 quad or using 9 quads) is basically a trade-off between using extra CPU time (9 quads) or using extra GPU time (1 quad).

In my opinion the 1 quad method is much better, so I'm going to include it here, if you want the other solution, then I'll add that too.

So, you'll need a border width on the 9-slice texture, the border width on the GUI and the texture coordinates. Before doing anything, you'll need to project the border width of the window to the UV coordinates. This would look something like this:

uniform vec2 u_dimensions;
uniform float u_border;

// Later before other operations
vec2 borders = vec2(u_border) / u_dimensions.xx;

// Use borders.x for the x axis and borders.y for the y axis

So, you should deal with the 2 axes separately, because they are largely the same. First, if the coordinate on the current axis is less, than the width of the window's border, then you can leave it as it is. If it's less, than 1 - borders.x if you're dealing with the x axis or 1 - borders.y if you're dealing with the y axis, then you'll need to scale it a bit. Here's where the border size on the 9-slice texture comes into play. Basically, you'll need to map the values between textureBorder and 1 - textureBorder where textureBorder is the width of the border on the 9-slice. And lastly, if the coordinate on the axis is more, than 1 - borders.[x/y], then you'll need to map it between 1 - textureBorder and textureBorder. Since the map function doesn't exist in glsl, here's a replacement:

float map(float value, float originalMin, float originalMax, float newMin, float newMax) {
    return (value - originalMin) / (originalMax - originalMin) * (newMax - newMin) + newMin;
} 

You use it as a traditional map function. So, together, the code would look like this:

// Helper function, because WET code is bad code
// Takes in the coordinate on the current axis and the borders 
float processAxis(float coord, float textureBorder, float windowBorder) {
    if (coord < windowBorder)
        return map(coord, 0, windowBorder, 0, textureBorder) ;
    if (coord < 1 - windowBorder) 
        return map(coord,  windowBorder, 1 - windowBorder, textureBorder, 1 - textureBorder);
    return map(coord, 1 - windowBorder, 1, 1 - textureBorder, 1);
} 

void main(void) {
    borders = vec2(u_border) / u_dimensions.xx;
    vec2 newUV = vec2(
        processAxis(a_uv.x, u_textureBorder, borders.x),
        processAxis(a_uv.y, u_textureBorder, borders.y)
    );
    // Output the color
    o_colour = texture(sampler, newUV);
}

Quick note: if you define your GUI windows, as 3 units wide and 2 units tall and you want the border, to occupy the 1/30 of the horizontal space, then you need to pass 0.1 as the windows border width.

\$\endgroup\$
0

You must log in to answer this question.